Azure Migrate
Before Dr Migrate is deployed verify the below prerequisites to ensure a smooth deployment.
Prerequisites Checklist
Use the checklist below a reference point to ensure that the environment is ready for a Dr Migrate deployment.
| Requirement | Learn More | |
|---|---|---|
| ✅ | Complete Marketplace Infrastructure Setup. | Learn More |
| ✅ | Complete Azure Migrate Project Configuration. | Learn More |
| ✅ | Complete Fabric (Power BI) Configuration. | Learn More |
Marketplace Infrastructure Setup
Permissions Required
Ideally the user performing the following steps should have the Global Administrator role.
If this is not possible, the least privileged approach to deployment requires the following permissions:
- Application Admin
- Groups Admin
- Subscription Owner
- Fabric Admin
- Marketplace Admin
- User Access Administrator
For more information about least privileged role assignment in Azure please see the Microsoft Learn Portal
Deploy and Configure Azure Migrate
Azure Migrate is a mandatory prerequisite for Dr Migrate. Successful assessments have Azure Migrate installed, configured and collecting data prior to Dr Migrate deployment.
Dr Migrate leverages the data collection capability of Azure Migrate. Ensure that you have:
- Deployed an Azure Migrate Project.
- Deployed an Azure Migrate Appliance.
- Connected the Azure Migrate Project and Appliance.
- Provided all necessary permissions to collect data.
Microsoft has robust and detailed guides on how to deploy and configure Azure Migrate here, or refer to the deployment checklists above.
Create Azure Migrate Project and Connect Appliances
Prerequisites for Azure Migrate Project:
- An active Azure subscription
- Appropriate permissions to create resources in your Azure subscription
- A resource group where the Azure Migrate project will be deployed
Create New Azure Migrate Project (If Required)
If you don’t already have an Azure Migrate project, follow these steps to create one:
Click here for detailed instructions
Sign in to Azure Portal
- Navigate to Azure Portal
- Sign in with your Azure account
Search for Azure Migrate
- In the search bar, type “Azure Migrate”
- Select Azure Migrate from the search results
Create New Project
- Click Create or Add to start creating a new Azure Migrate project
- Select your Subscription and Resource Group
- Choose a Project name (e.g., “MyMigrationProject”)
- Select your Geography (the region where your project metadata will be stored)
Configure Project Settings
- Assessment tool: Select “Azure Migrate: Discovery and assessment”
- Migration tool: Select “Azure Migrate: Server Migration” (if needed)
- Click Create to deploy the project
Configure Endpoint Settings
- Navigate to your newly created Azure Migrate project
- Go to Properties in the left-hand menu
- Under Connectivity method, select Public endpoint
- Click Save
Verify Project Creation
- Once deployed, navigate to your Azure Migrate project
- Note down the Project name and Resource Group for use with Dr Migrate
Verify Existing Azure Migrate Project (If Already Deployed)
If you already have Azure Migrate deployed, verify the following:
Verify Project Location
- Navigate to your existing Azure Migrate project in the Azure Portal
- Note the Subscription and Resource Group where it’s deployed
- Ensure your Service Principal has access to the subscription/resource group where the Azure Migrate project is located
Verify Endpoint Settings
- Navigate to your Azure Migrate project
- Go to Properties in the left-hand menu
- Verify Connectivity method is set to Public endpoint
Connect Azure Migrate Appliances
After creating or verifying your Azure Migrate project, you must deploy and connect at least one Azure Migrate appliance to collect data from your infrastructure:
-
Deploy the appropriate appliance for your environment:
- VMware: Deploy the VMware appliance
- Hyper-V: Deploy the Hyper-V appliance
- Physical servers: Deploy the physical server appliance
-
Configure the appliance with your Azure Migrate project details
-
Start discovery to collect data from your infrastructure
-
Verify data collection is working properly
Verify Appliance Status and Data Collection
- Check that at least one Azure Migrate appliance is connected to your project
- Verify the appliance is actively collecting data
- Ensure the appliance has discovered the infrastructure you want to assess
- Navigate to Servers, databases and web apps in your Azure Migrate project
- Confirm that servers are being discovered and data is being collected
- Ensure the data is recent and up-to-date
Azure Migrate Deployment Guides according to target infrastructure:
For detailed step-by-step instructions on deploying and configuring Azure Migrate appliances, see the deployment guides above or refer to the Microsoft Learn documentation.
Create Service Principal
Dr Migrate requires a Service Principal be created to allow the Dr Migrate server to communicate with Azure Migrate and Power BI.
When creating the SPN please observe the following:
- SPN Name - It is recommended to name the App Registration “drmigrate-spn”. All other settings can be left as default
- Client Secret Creation - Dr Migrate requires a client secret to be created, it is recommended to set the expiry to 12 months.
For Microsoft documentation on creating a Service Principal in Entra ID, see here
Configure SPN Access
Assign your Service Principal, the following permissions
| Role | Scope | Reason Required | Requirement |
|---|---|---|---|
| Contributor | Subscription or Resource Group where the Azure Migrate project is located (may be in a different tenant than Dr Migrate) | Used to collect Azure Migrate data | Mandatory |
Enable Cost Management Policy for EA Pricing
Enterprise Agreement Customers Only: Skip this section if you do not have an Enterprise Agreement with Microsoft. If you have an EA and want Dr Migrate to apply your agreed discounts when providing TCO costings, complete both requirements below.
After completing these prerequisites, you can sync your EA pricing through the TCO Config interface. See the Sync Enterprise Agreement Pricing guide for instructions.
Assign Cost Management Reader Role
Assign the Cost Management Reader role to your Service Principal:
| Role | Scope | Reason Required | Requirement |
|---|---|---|---|
| Cost Management Reader | Subscription where Azure Migrate is deployed | Used to access customer specific price sheet | Required for EA pricing |
Enable Account Owners Can View Charges Policy
Complete these additional steps to enable EA pricing access:
- Sign in to Azure Portal with an Enterprise Administrator account
- Navigate to Cost Management + Billing
- Select your Billing Account
- Under Settings, choose Policies
- Set “Account owners can view charges” to On
Learn More about how to assign RBAC roles here
Create a Security Group for the Service Principal
Create a security group to house the Service Principal and Assign the Power BI permissions.
- Group Name - It is recommended to name the Security Group “drmigrate-powerbi”. All other settings can be left as default
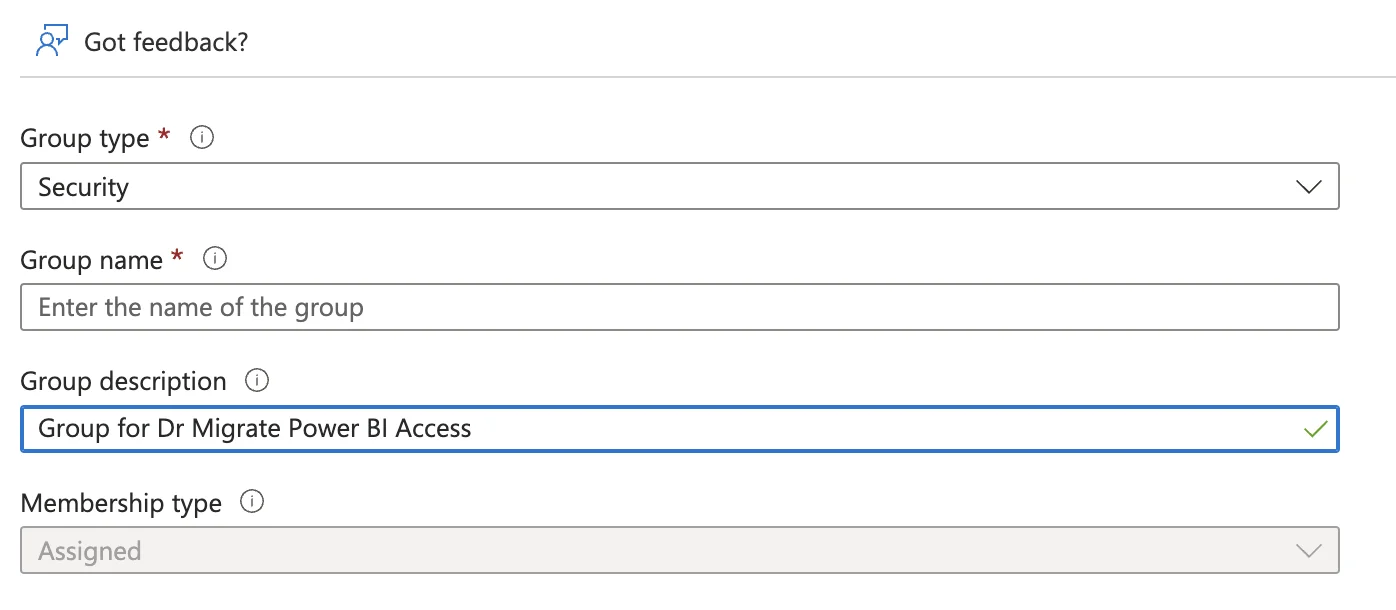
Create a new security group with the recommended name
- Group Membership - The Service Principal should be added as a member of the security group.
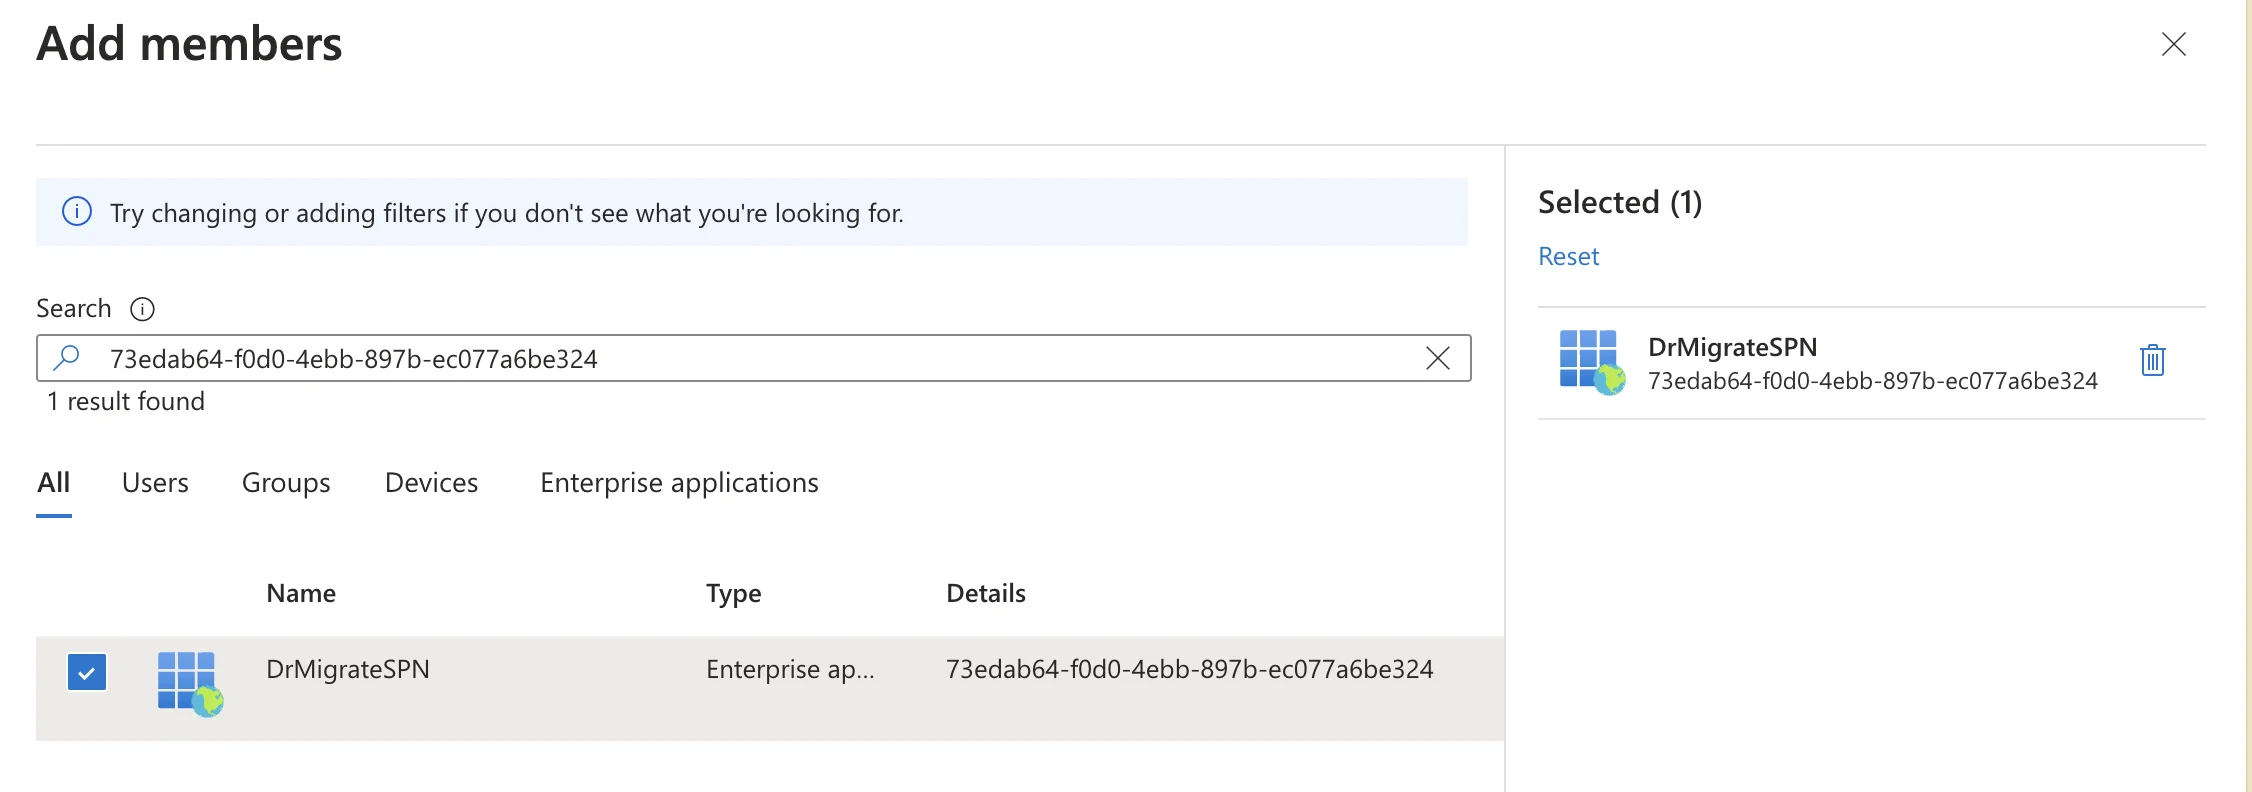
Add the service principal as a member of the security group
To learn more about how to assign access to Entra ID Security Groups, see here.
Audit Azure Policy
When Dr Migrate installs, it deploys Azure resources to a managed Resource Group, these resources may be subject to Azure policy. Dr Migrate allows certain policy enforcement during its installation, such as the inheritance of tags. However, it is possible Azure Policy may attempt to enforce an action on Dr Migrate resources during deployment that may be blocked. When this scenario occurs the application deployment will fail.
To mitigate this risk it’s recommended that some policies be temporarily exempted at the Subscription level, prior to and for the duration of the Dr Migrate installation.
Different Azure policies have different effects:
Temporarily exempt policies that are applied to the subscription that have the following effects.
- Append
- DeployIfNotExists
- Deny
- Modify
To learn how to exempt Azure Policy from resources, please see here
Fabric (Power BI) Configuration
Configure settings in the Power BI tenant
Head to Power BI Admin Portal to configure access to the Power BI settings for the Security Group containing the Service Principal.
From the left hand side menu select Tenant Settings, you will be presented with a list of options, that need to be configured.
Most of these settings need to be enabled. You can either have this at the organizational level

Apply settings at the organizational level
or specify the Dr M Security Group.

Apply settings to specific security groups
If the setting is already configured at the organizational level, it normally does not need to be updated.
Configure the following settings:
Workspace settings -> Create workspaces (new workspace experience)
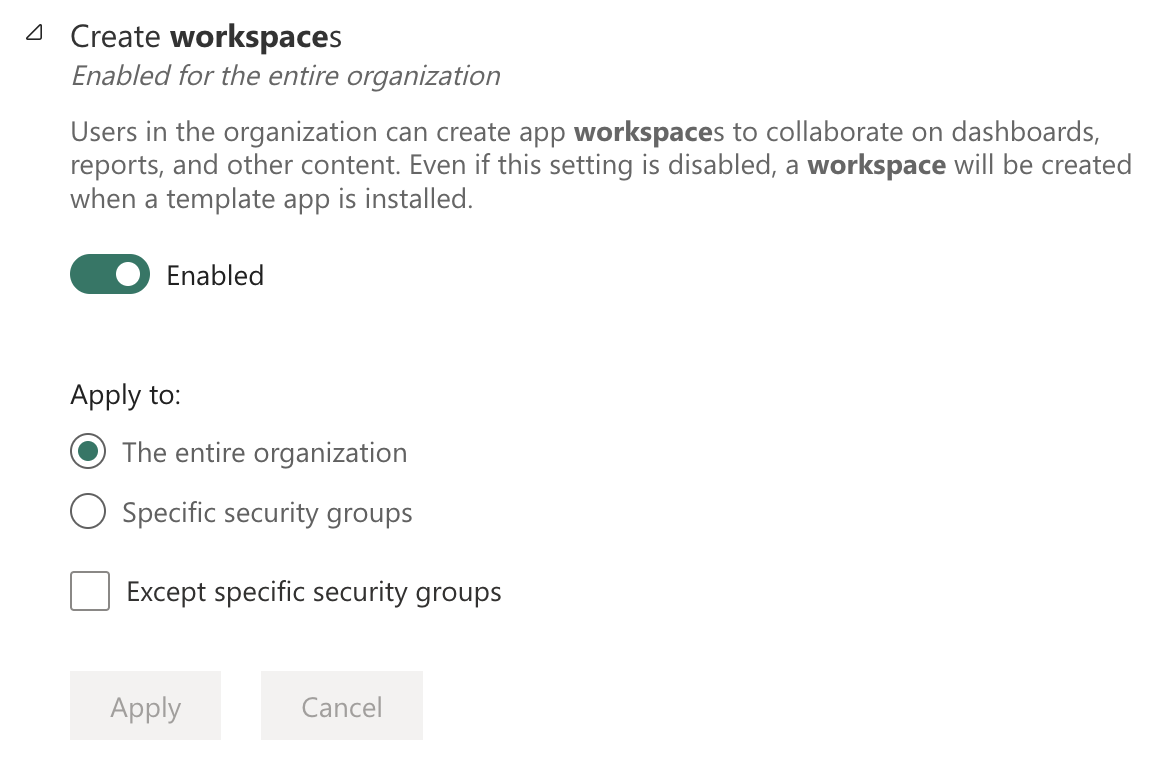
Configure workspace creation settings
- Developer settings -> Embed content in apps
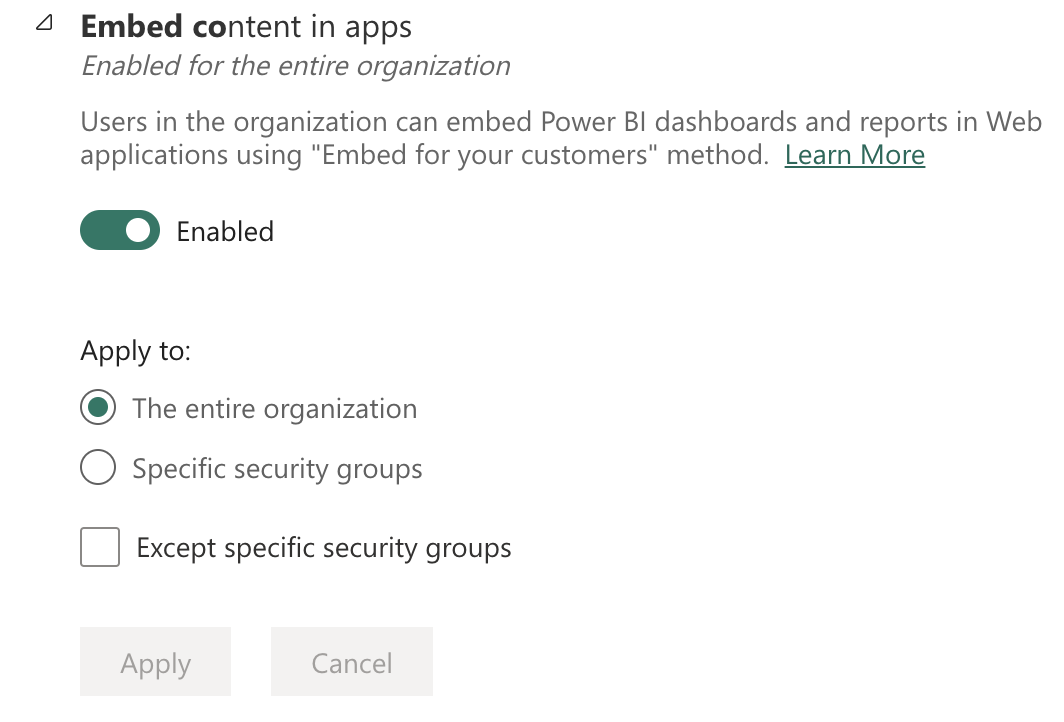
Configure embed content in apps settings
- Developer settings -> Service principals can call Fabric public APls
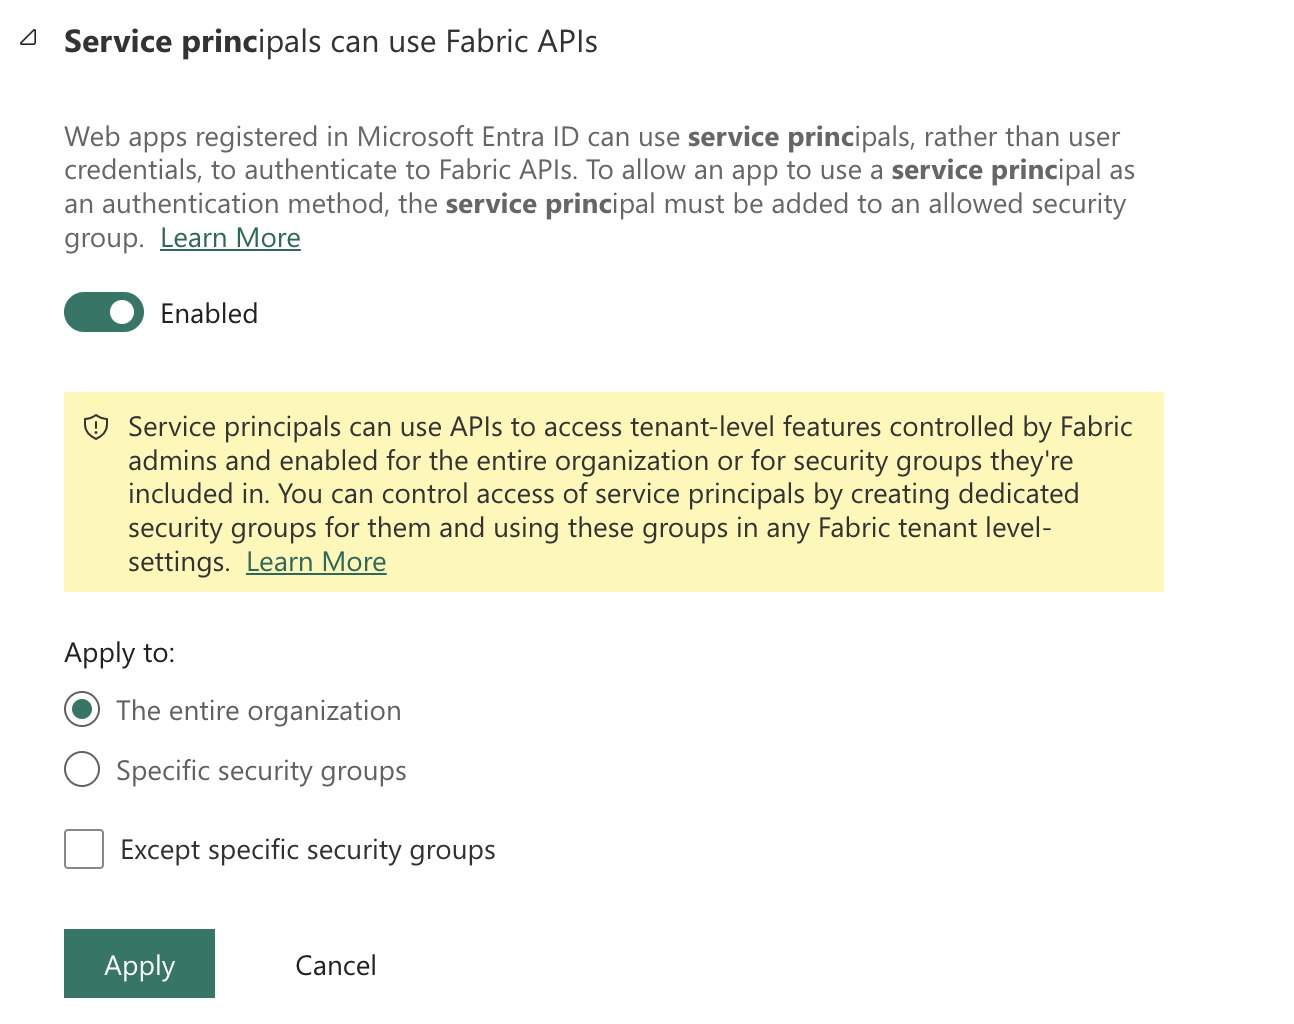
Configure service principal access to Fabric APIs
- Developer settings -> Service principals can create workspaces, connections, and deployment pipelines
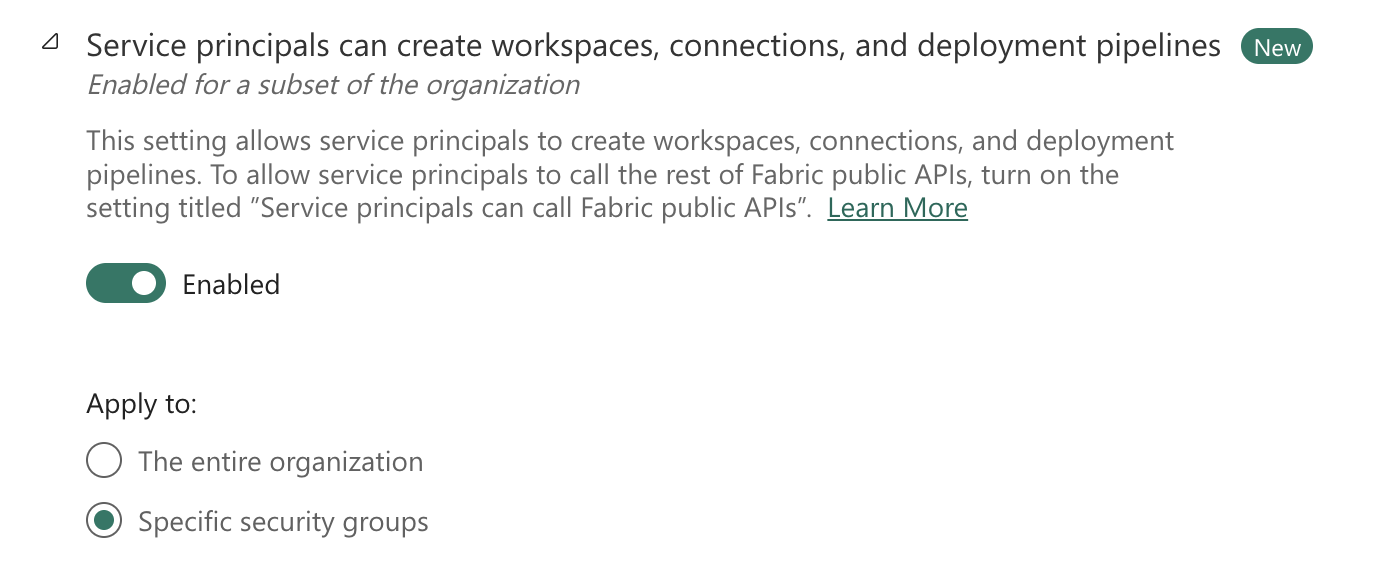
Service principals can create workspaces, connections, and deployment pipelines
- Export and sharing settings -> Export to Excel

Configure Excel export settings
- Export and sharing settings -> Export to .csv
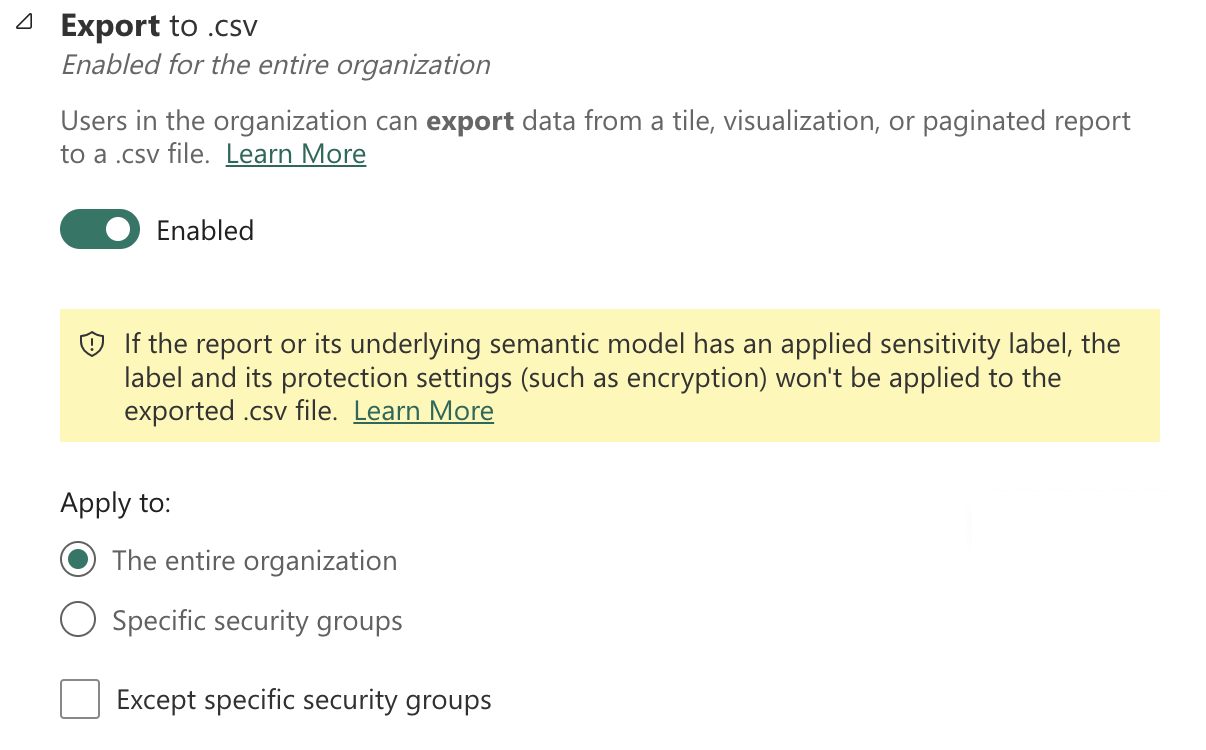
Configure CSV export settings
- Export and sharing settings -> Export reports as PowerPoint presentations or PDF documents
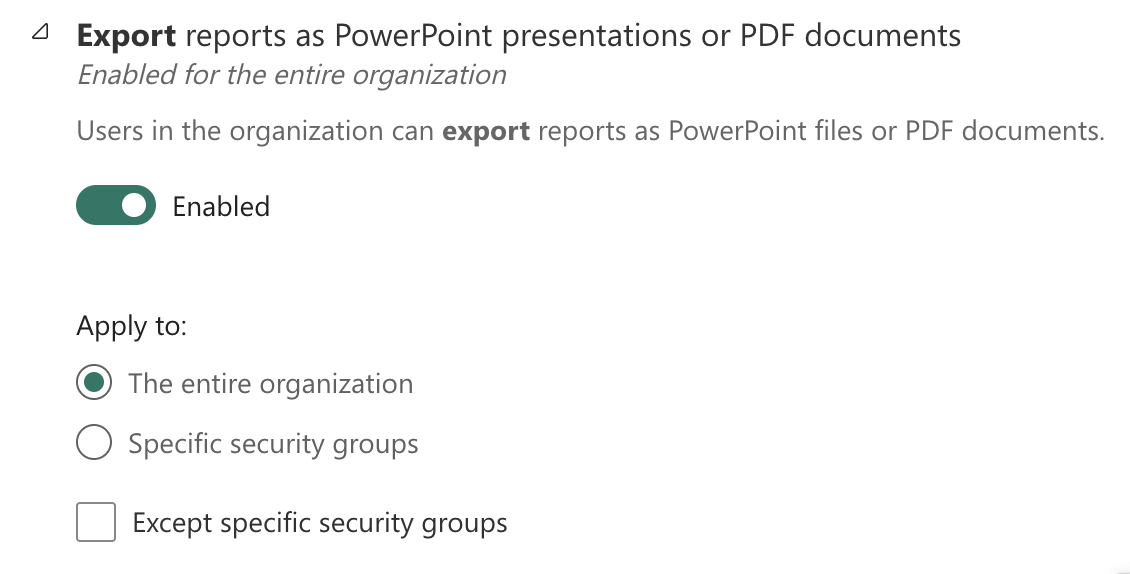
Configure PowerPoint and PDF export settings
Power BI visuals -> Allow visuals created using the Power BI SDK.
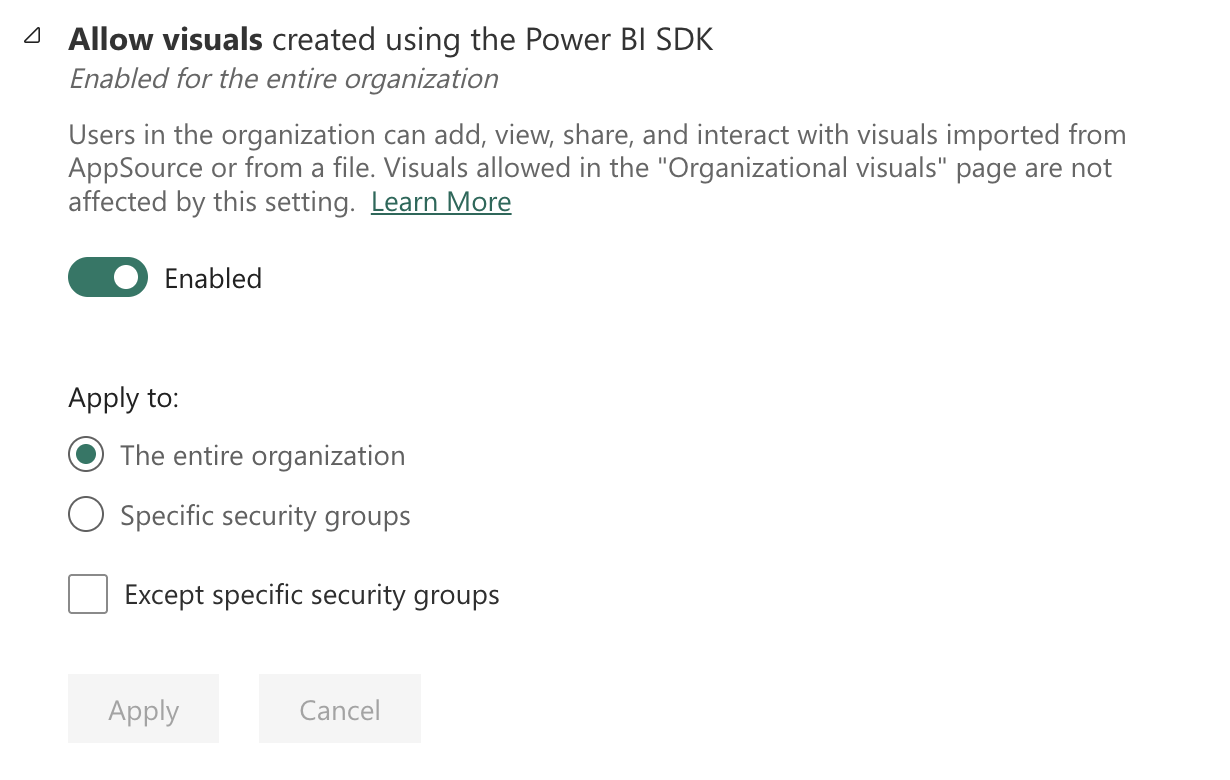
Allow visuals created using the Power BI SDK
Required Visuals Instaltion
The Network Navigator visual is required for advanced dependency mapping functionality within this report. To ensure full feature availability for all users, it must be installed into the Organizational Visuals section of Power BI.
-
Download the
.pbivizfile from the Network Navigator GitHub repository. -
As a Fabric Admin, access the Power BI Admin Portal.
-
Navigate to Organizational Visuals.
-
Select Add a custom visual, then choose Upload from file.
-
Browse to the downloaded
.pbivizfile and upload it. -
Once uploaded, the visual will be available for all users in your organization via the Organizational Visuals pane in Power BI.
Gateway Administration
Dr Migrate uses an On-Premises data gateway as part of the solution.
Within the Power BI Admin Center, navigate to “On-Premises data gateways” in the central panel.
Enable the Tenant Administration Settings using the switch on the right-hand side.

Enable tenant administration settings
Enabling this will show the “Manage Gateway Installers” option.
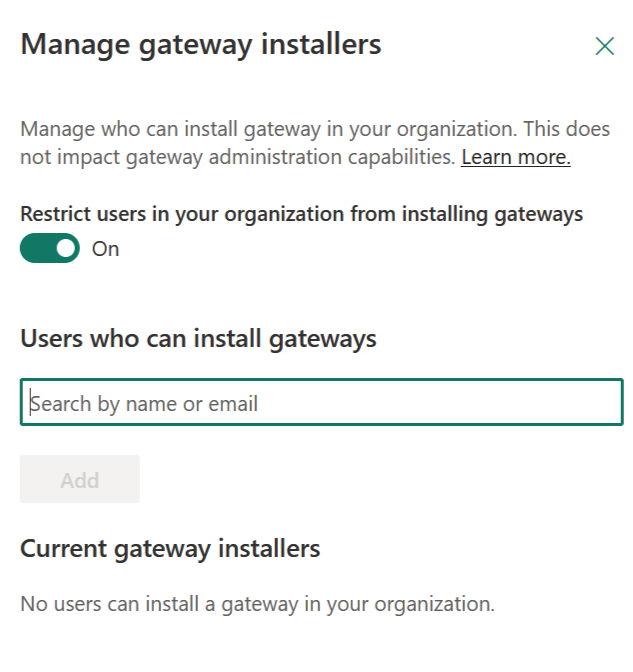
Enable tenant administration settings
Add Service Principal to Gateway Installers
Add Service Principal to Gateway Installers
In the “Manage Gateway Installers” section, click Add or Add users
Search for Service Principal
Search for and select the Dr Migrate Service Principal (drmigrate-spn)
Complete Addition
Add the Service Principal to the Gateway Installers list
This approach maintains security by only granting the specific Service Principal the necessary permissions without affecting other organizational settings.
Alternative Approach: If adding the SPN to Gateway Installers is not possible, you can temporarily disable the gateway installation restriction:
Ensure that the “Restrict users in your organization from installing gateways” setting is set to Off.
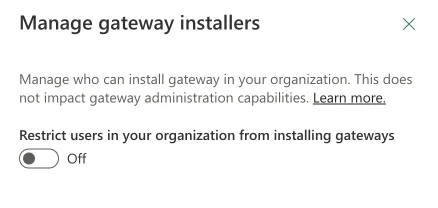
Configure gateway installation restrictions
If using this alternative approach:
- Turn this setting to “Off” while the Dr Migrate product is installing
- Turn the setting back “On” 60 minutes post installation
Next Steps
After completing the configuraton, you can: