

Hyper-V
Before you start
Complete the setup in Hyper-V Requirements before running this scan.
You will need:
- A Windows jump box with at least 20 GB free disk space and network access to your Hyper-V hosts and their guest VMs
- Guest OS administrator credentials for the servers you want to scan (see Credential requirements)
- The list of servers to scan (or a CSV to import)
Download DMC, launch it, and enter your license key on the Running DMC page first, then come back here once you've selected Non-VMware & Physical.
Running the scan
Launch DMC on the jump box, select Non-VMware & Physical as the scan type, then work through the wizard.
- DMC is specifically designed to allow a customer Administrator to securely utilise their admin credentials for a one-time operation.
- All credentials are stored in memory only and never persist beyond execution.
- Credential requirements are tailored for one-time use, allowing administrators to securely employ their personal credentials.
Configure
Begin by adding the Hyper-V guest machines that you wish to target for scanning.
Before selecting servers in DMC, you must export a list of guest machines from your Hyper-V estate. This ensures all VMs are accounted for and can be imported into DMC efficiently.
You can add Hyper-V guest servers using either of these methods:
Option 1: Add Servers One by One
Use the DMC UI to add each Hyper-V guest manually by specifying the FQDN or IP address, selecting the OS type (Windows or Linux), and providing credentials.
Option 2: Use a CSV Template (Recommended for Hyper-V)
Prepare a CSV file using the provided template to list all Hyper-V guest machines with their details. You can import this CSV using the Import CSV option in the DMC interface.
The CSV template should have the following structure:
CSV Format
host,os
Supported OS values:
windowslinux
DMC will try to automatically determine the OS type, however you can override this as needed.
Example:
host,os
host01,windows
host02,linux
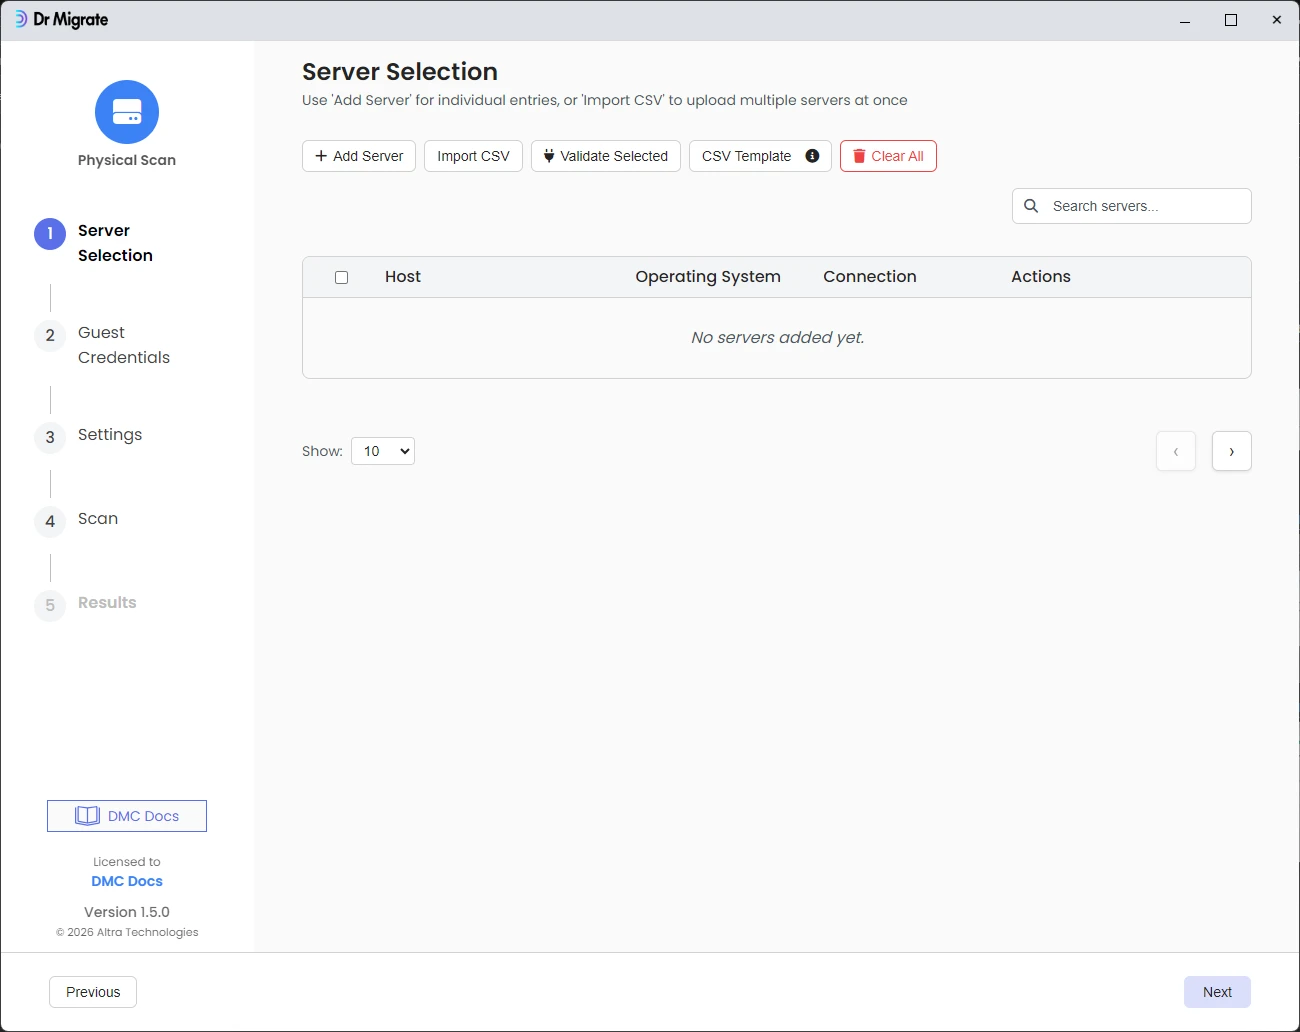
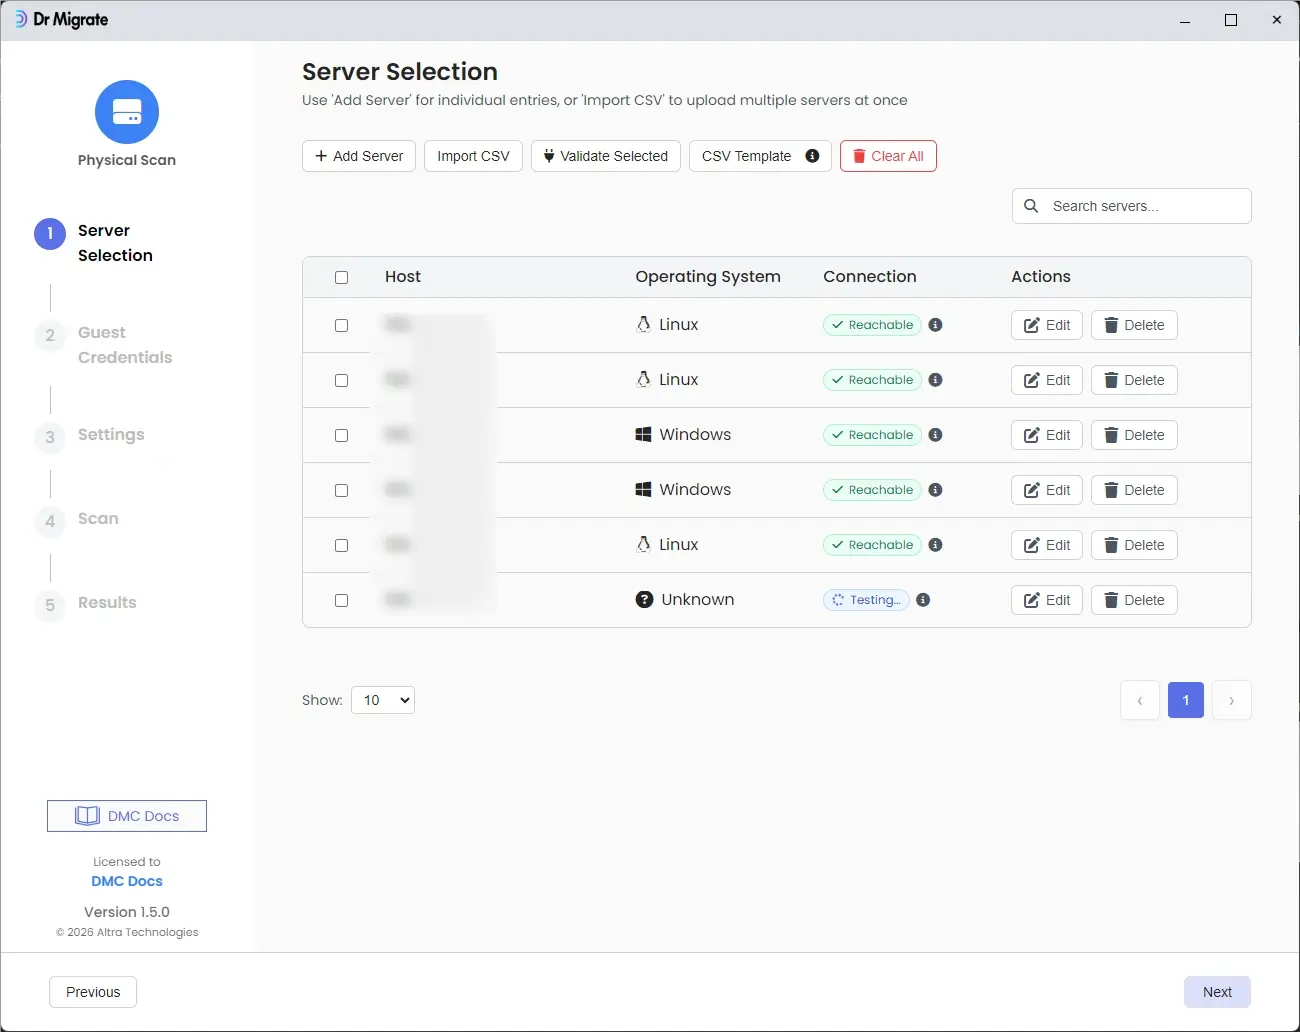
Click Next after you have added all target Hyper-V guest servers.
DMC will validate connectivity for the servers that have been added and provide a detailed report.
Click the Status button to show the connection report.
This report provides:
- Server Connectivity: Network communication status
- Credentials: Access rights verification for the provided credentials
- Server Health: Overall system status and performance
It is highly recommended that you review the connection status of each server you add to ensure that connectivity, credentials, and health are all correct before you move through to the next step.
For servers that fail validation, review the error messages and help info.
Address connectivity or credential issues before proceeding:
- Ensure ports 5985/5986 (Windows) or 22 (Linux) are open
- Verify WINRM/PSRemoting is enabled (Windows)
- Ensure servers are powered on and accessible
- Re-import or manually adjust server details
For detailed troubleshooting steps and solutions, see Remediating Access Issues.
Guest Credentials
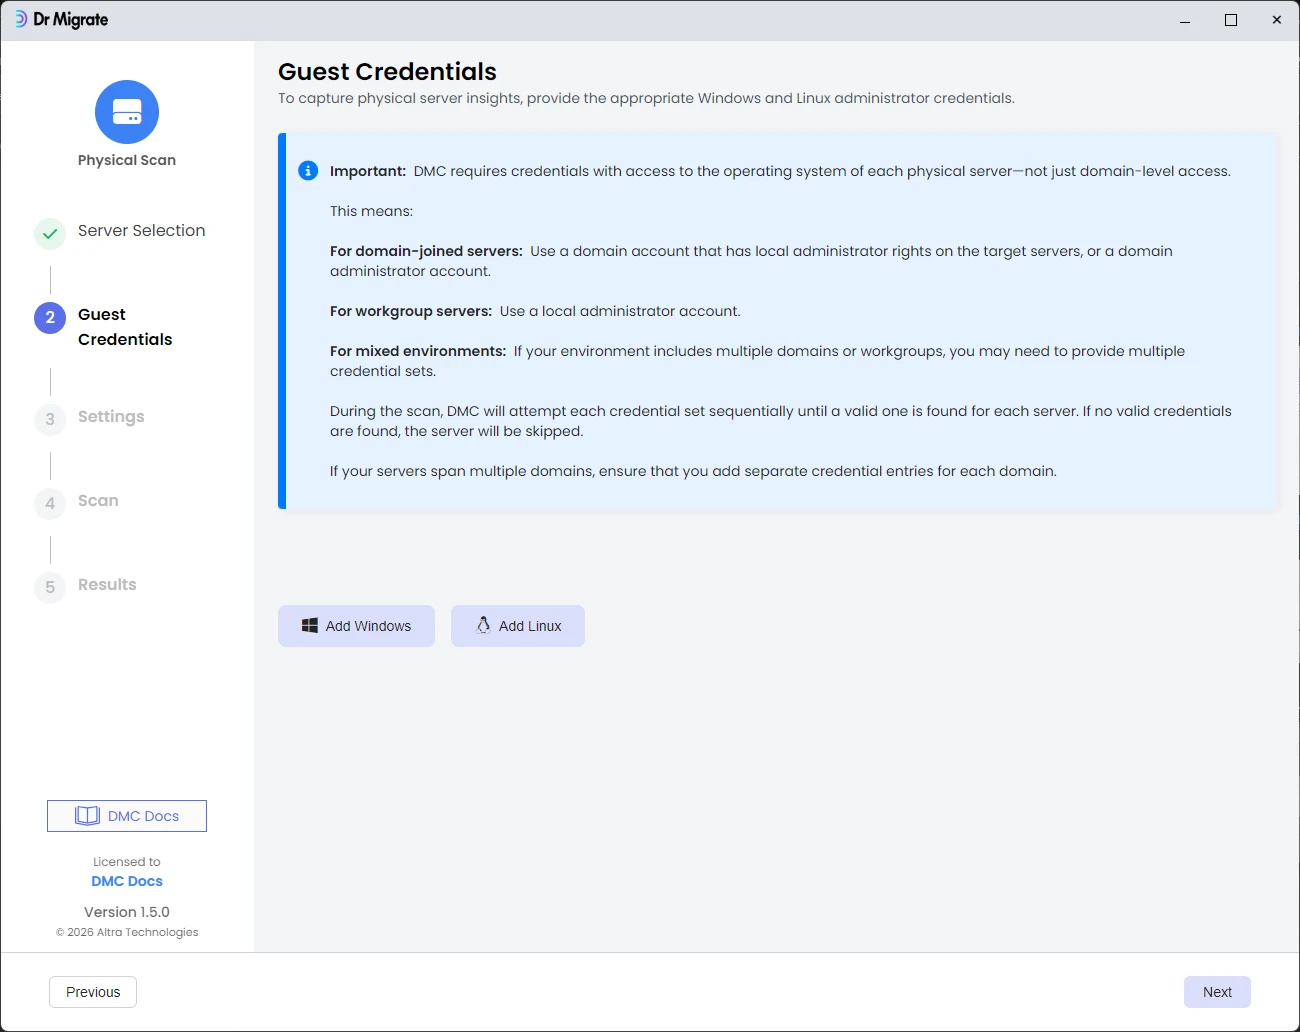
Now add credentials that will be used to connect to both Windows and Linux servers.
Windows Authentication
Windows servers require password-based authentication
Important: DMC requires credentials that can access the guest operating system of each server, not just domain-level access.
-
Domain-joined servers: Use a domain account with local admin rights, or a domain admin account
-
Workgroup servers: Use a local administrator account
-
Mixed environments: Add multiple credential sets for different domains or workgroups
Each credential set must use the same authentication method for all target servers.
Steps:
-
Click Add Windows button
-
Enter the Username (domain or local admin account)
-
Enter the Password for authentication
-
Provide a Friendly Name (e.g., "Production Windows Servers")
-
Click Save
For detailed Windows account requirements, see System & Access Requirements.
Linux Authentication
Linux servers support both password and SSH key authentication methods.
Password Authentication
Traditional username/password combination suitable for environments where SSH keys aren't configured.
Steps:
- Click Add Linux button
- Select Password authentication method
- Enter the Username (Linux username with sudo access)
- Enter the Password for authentication
- Provide a Friendly Name (e.g., "Production Linux Servers")
- Click Save
SSH Key Authentication (Recommended)
More secure authentication method using SSH private keys. No password management required.
Steps:
- Click Add Linux button
- Select SSH Key authentication method
- Enter the Username (Linux username with sudo access)
- Upload your SSH Private Key file
- Provide a Friendly Name (e.g., "SSH Key Linux Servers")
- Click Save
Need help creating SSH keys? See the Creating SSH Keys for use with DMC guide for step-by-step instructions.
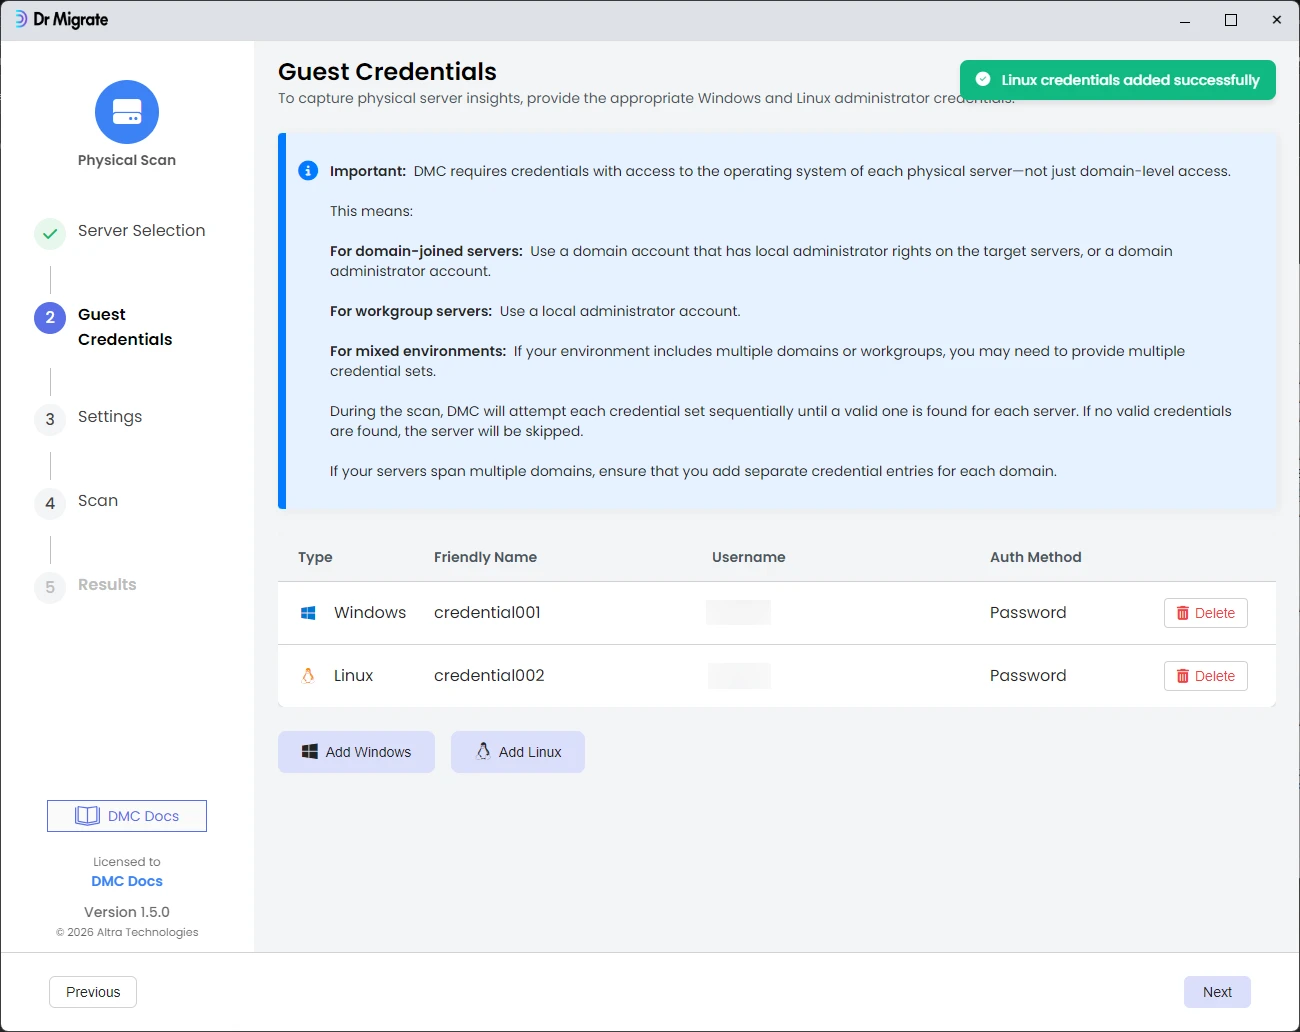
Validate guest credentials
Click Next. DMC will validate the entered credentials on a subset of your servers. Any invalid credentials are flagged.
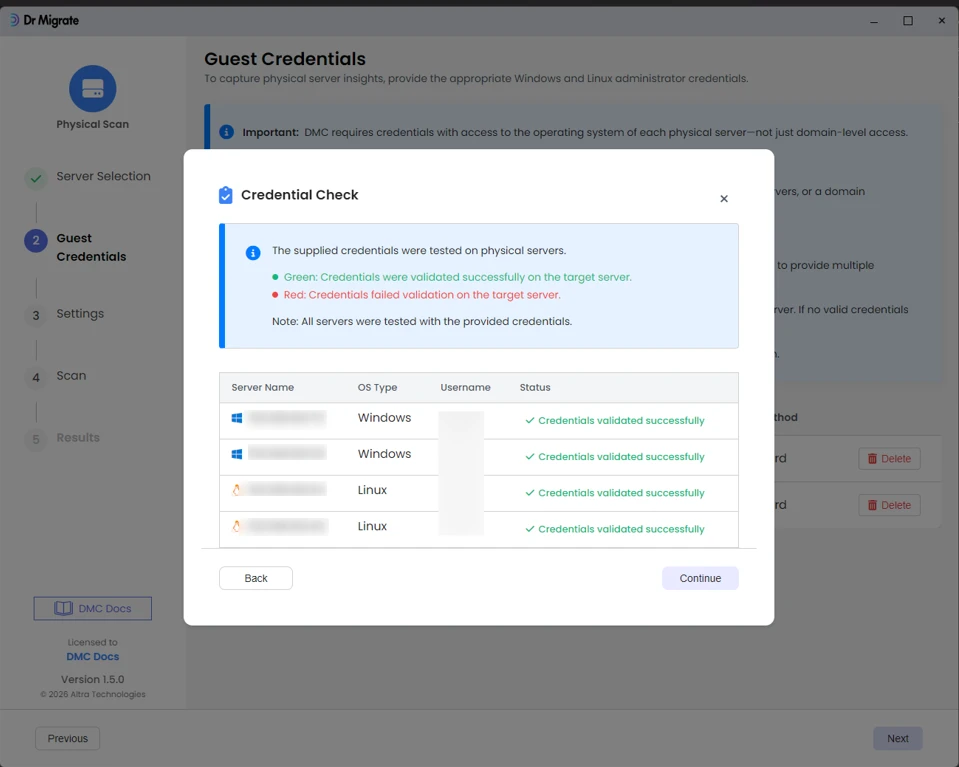
Click Continue after validation completes.
Settings
Customize scan settings as required. These settings provide control over scan thresholds.
| Category | Setting | Description | Default |
|---|---|---|---|
| General | Output Path | Directory where scan results and logs are saved | C:\temp |
| Max Concurrent Servers | Number of servers processed concurrently | 5 servers | |
| Operation Timeout | Controls the maximum time a scan operation can run before being terminated | 5 minutes | |
| Scan Thresholds | CPU Usage (0–95%) | Skips scanning if CPU usage exceeds this threshold | 85% |
| Memory Usage (0–95%) | Skips scanning if memory usage exceeds this threshold | 75% | |
Windows C:\ Drive (0.1–10 GB) |
Skips scanning if available disk space is below this threshold | 2.0 GB | |
Linux / Partition (0.1–10 GB) |
Skips scanning if available disk space is below this threshold | 2.0 GB | |
Linux /tmp Partition (0.1–1.0 GB) |
Skips scanning if available disk space is below this threshold | 0.1 GB |
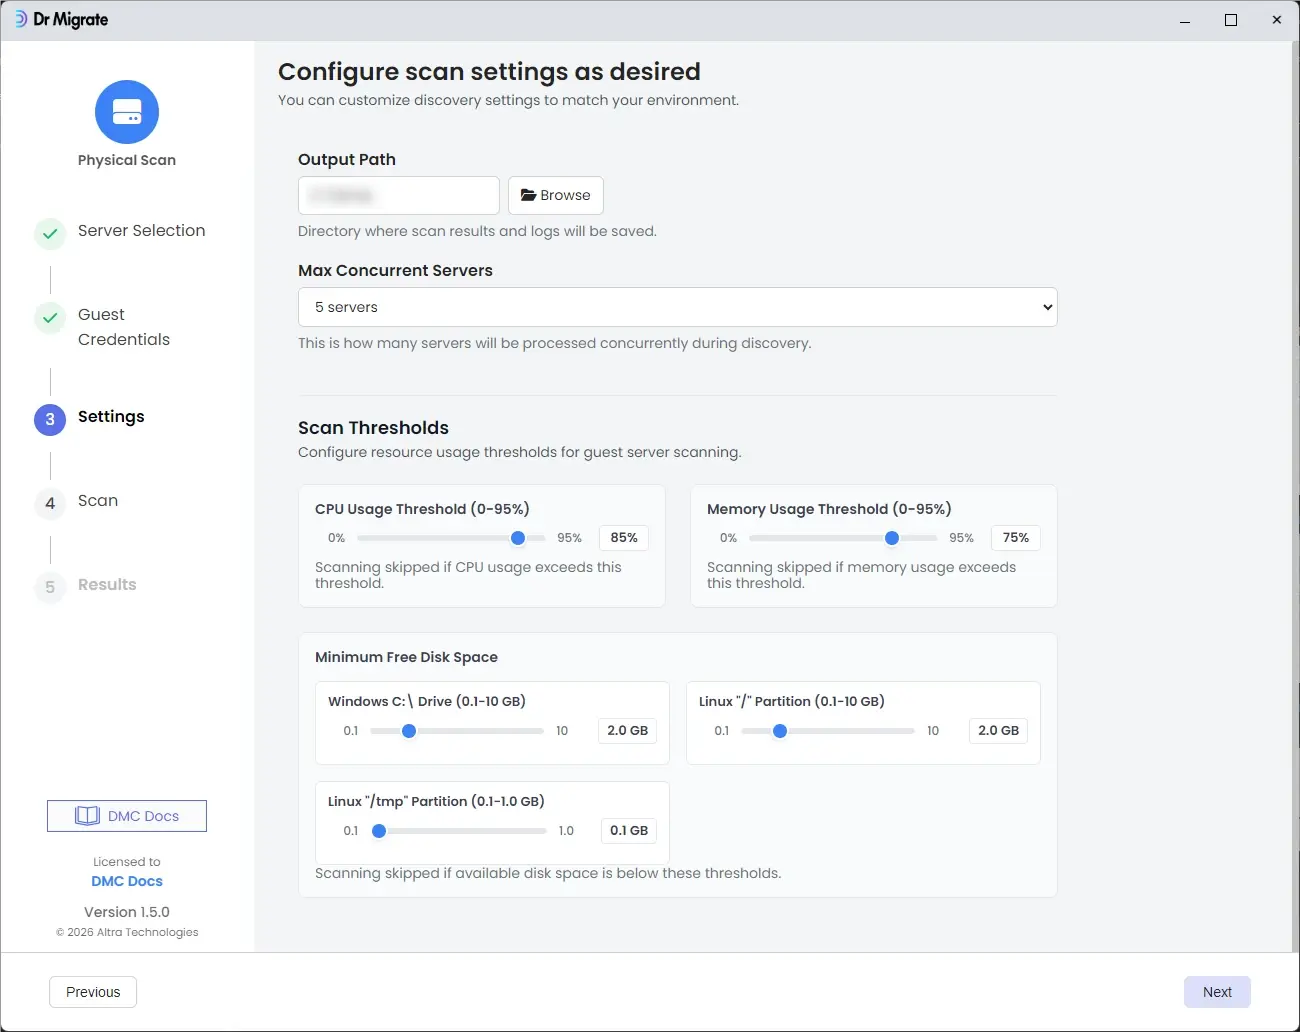
Click Next to proceed to the scan phase.
Scan
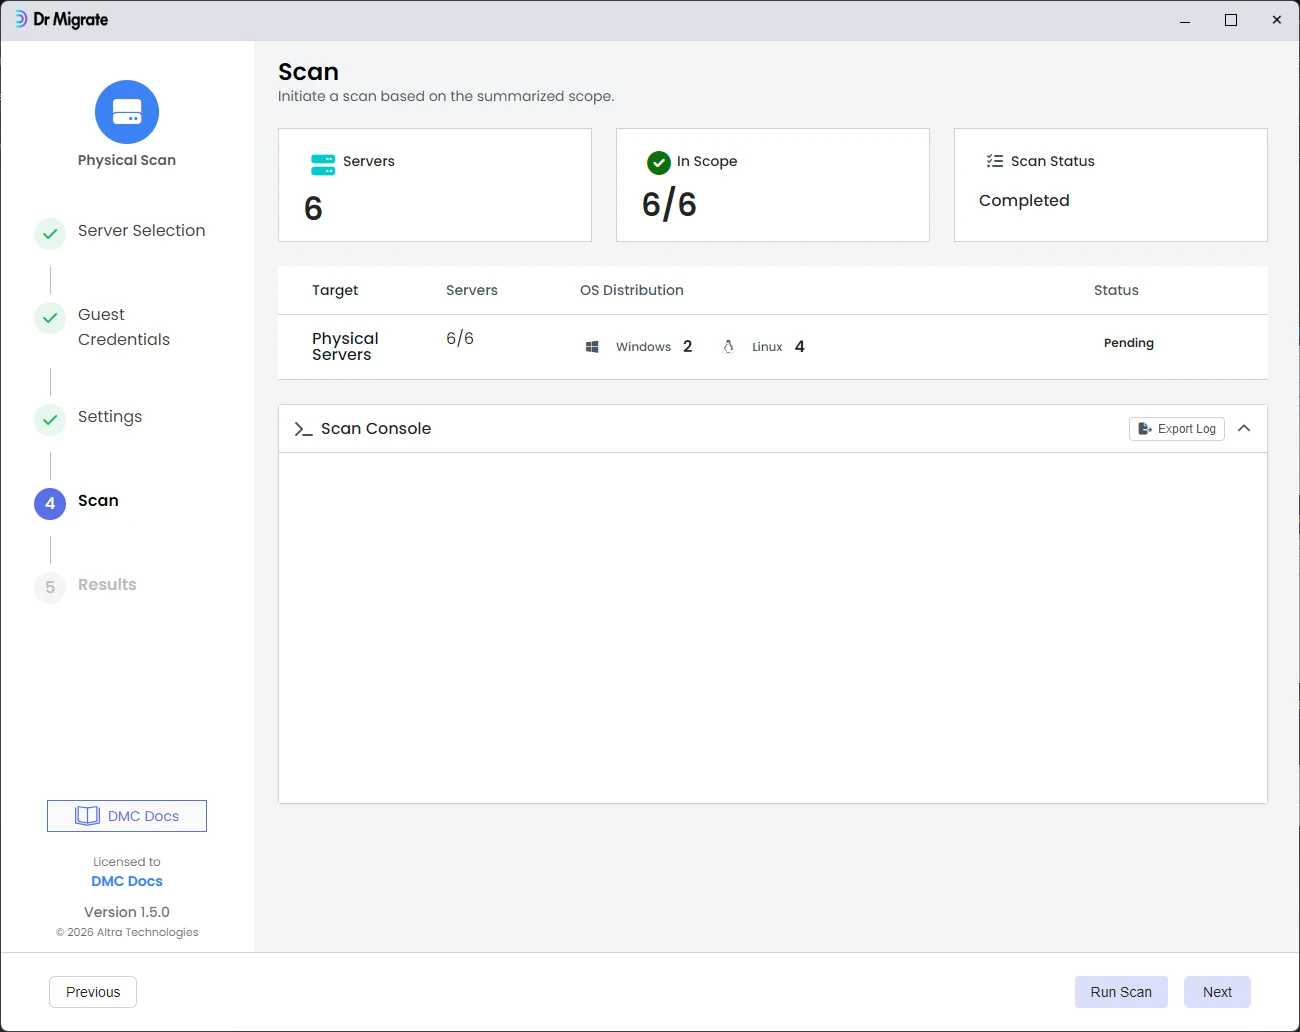
Now that you have successfully configured DMC, you can proceed to scanning your estate.
Review servers
Options for managing server scope:
- Export CSV: Download detected servers, edit externally, then re-import.
- Import CSV: Upload a pre-edited list of servers to include.
- Manual Selection: Use checkboxes, search, and OS filters to select servers.
CSV files can be edited with free tools like VS Code or Notepad++ for easier bulk editing.
Once satisfied, click Save to confirm the scan scope, then click Run Scan.
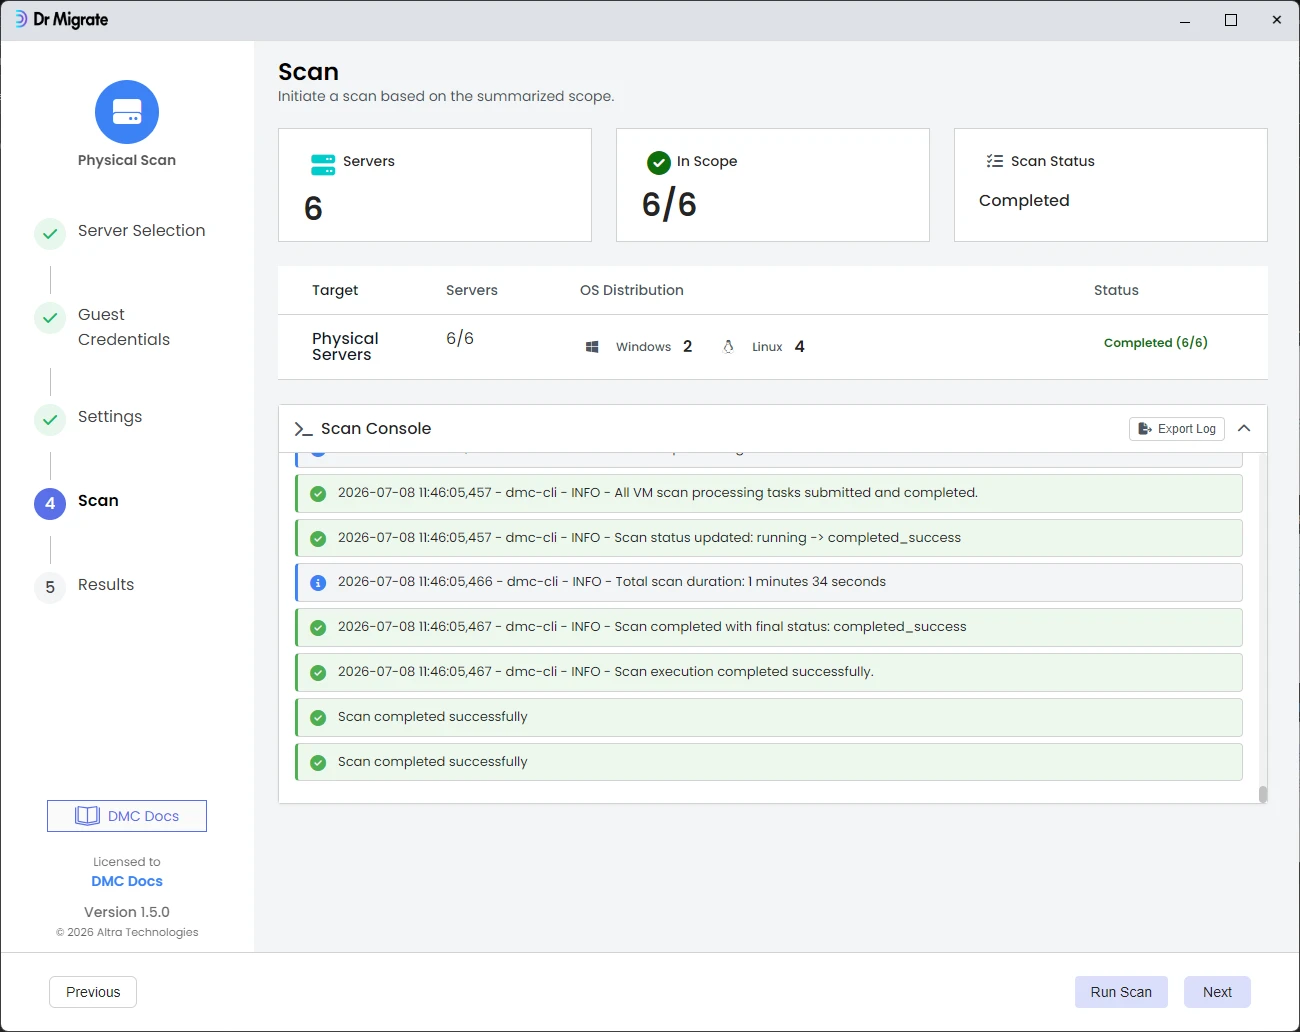
Monitor progress
Progress updates in real time with a Console Output log.
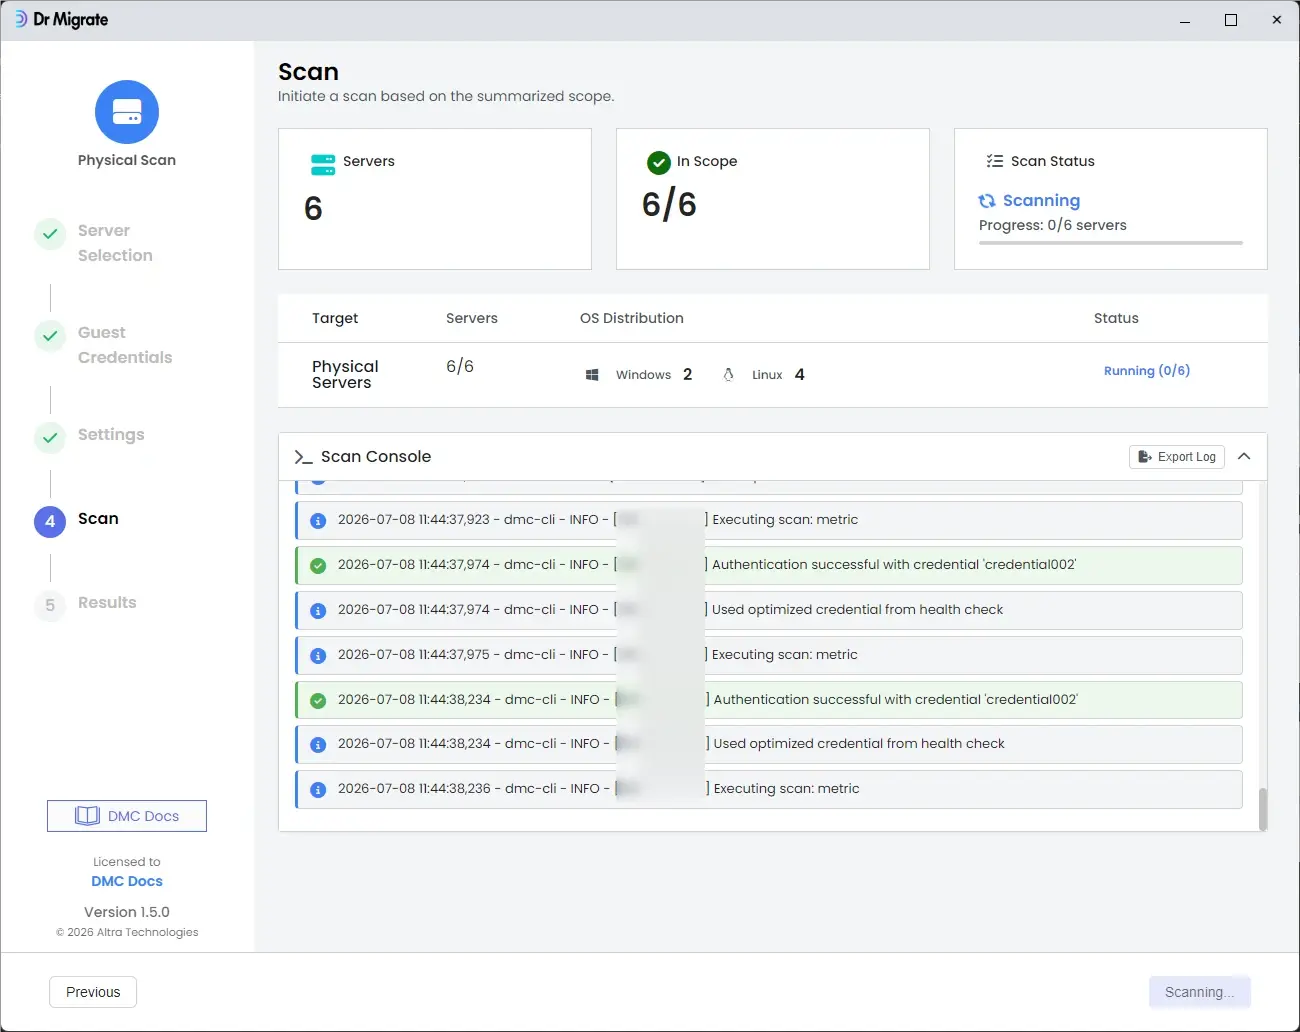
Each server typically requires ~45 seconds.
Total scan duration varies with the Max Concurrent Servers setting.
Results
With the scan completed, you can finalize results and upload them to the Dr Migrate platform.
Scan summary
The summary highlights:
- Status Bar: unified metrics showing scan status, duration, VMs scanned, Physical Servers scanned (if applicable), and SQL Servers scanned (if applicable)
- Scan Status Chart: bar chart showing full, partial, or failed scans (color-coded)
- Error Summary Chart: bar chart showing common error categories (e.g., credentials, network, agent, access, other)
- Scan Results Per Discovery Target: table showing grouped scan outcomes per discovery target with Full/Partial/Failed/Total counts
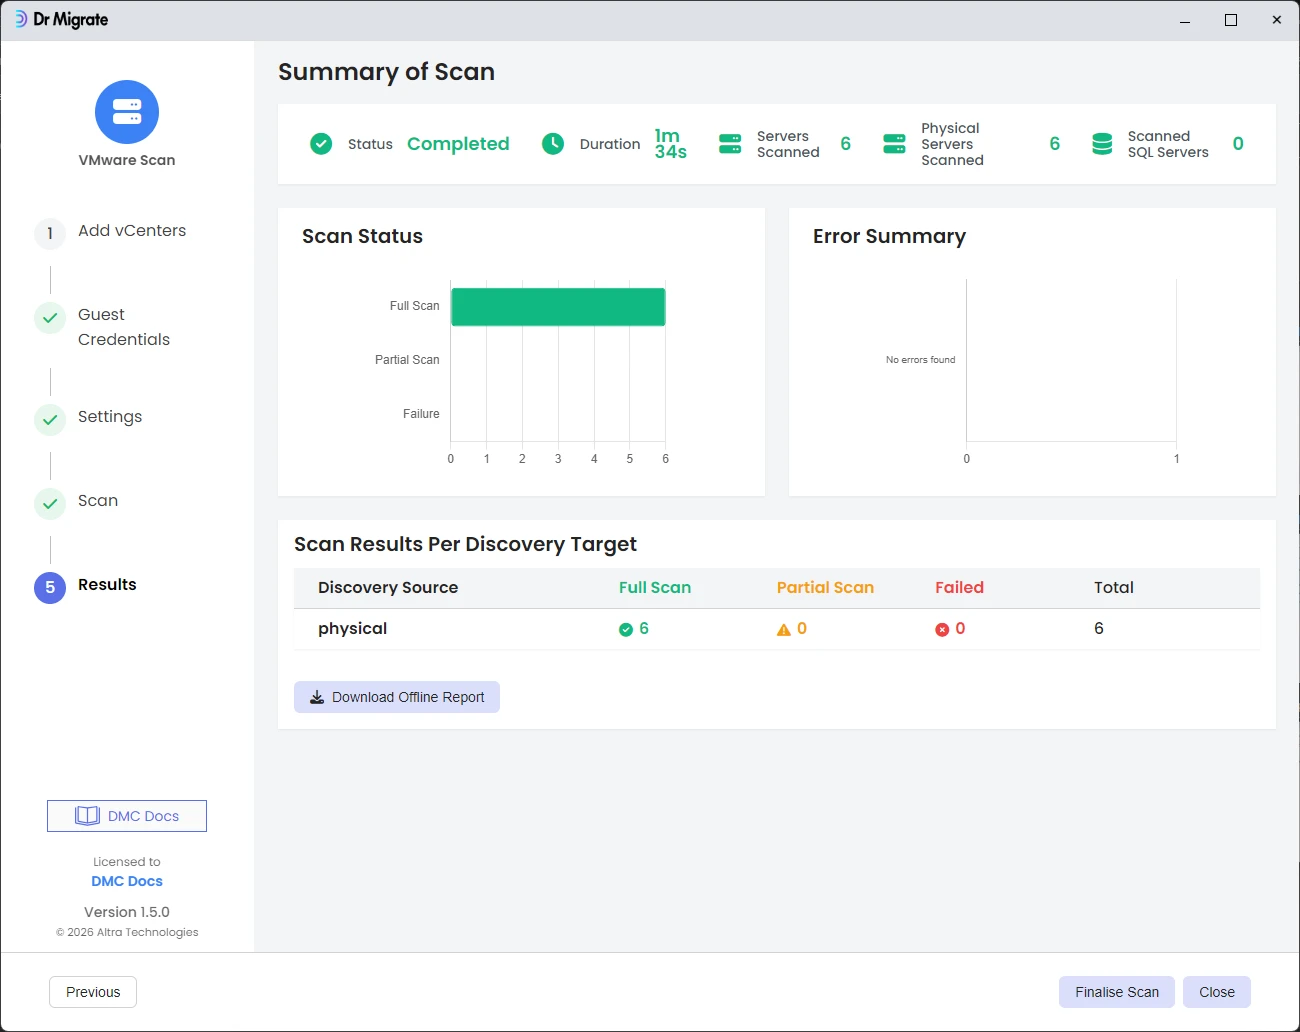
- Full scans = guest data
- Partial scans = host-only data
- No server scanned unless pre-scan checks (CPU/memory/disk) are passed
SQL Server discovery
During your Hyper-V scan (via Physical mode), DMC automatically discovers SQL Server instances installed on your guest VMs. When SQL Server installations are detected, DMC collects detailed information about each instance.
What Was Discovered:
- SQL Server instances are automatically detected when found during the scan
- Detailed information is collected for each SQL Server instance
- Instance details include: hostname, instance name, edition, version, port, and configuration
Important: This Hyper-V scan discovers SQL Server instances. SQL Server assessment can be performed after infrastructure discovery by completing additional steps using the separate Database Assessment mode.
Next step: Database Assessment
To assess your discovered SQL Server instances for migration readiness, you must complete a separate Database Assessment workflow.
When to Proceed: You can start Database Assessment immediately after completing your Hyper-V scan, or return to it later. Your discovered SQL Server instances will be available whenever you run a Database Scan.
What You Need to Do:
- Navigate back to the scan target selection page (click the back arrow or use the navigation menu)
- Select Database Assessment as the scan target
- Click Discover SQL Servers: this automatically loads SQL Server instances from your scan results
- Add SQL Server credentials (Windows Integrated or SQL Server Authentication): these are different from the guest OS credentials used in Hyper-V scans
- Map credentials to SQL Server instances: assign the appropriate credentials to each SQL Server instance
- Run Database Scan: execute the assessment to evaluate migration readiness
Important: SQL Server assessment can be performed after completing your Hyper-V scan. Follow the complete Database Assessment workflow, which includes adding SQL Server-specific credentials and mapping them to instances.
For complete step-by-step instructions on assessing SQL Server instances, including credential management and assessment execution, see the Database Assessment documentation.
Offline troubleshooting report
Click Download Offline Report to generate a standalone .html summary for troubleshooting.
Capabilities:
- Filter by discovery target and search by server name or error description
- View server details including Server Name, OS Type, Error Description, Log Path, and Resolution
- Sortable columns for easy organization
- Pagination (10 items per page) for large result sets
- Clickable log file links to open individual server logs
- Export filtered results to
.csv
See Offline Troubleshooting Report Guide for detailed usage.
This report is for diagnostics only.
Transformation strategy and migration recommendations are provided in the SaaS platform.
Finalise Scan
Click Finalise Scan to return to the scan target selection screen, where you can export your scan results and download the offline report.
Export
After clicking Finalise Scan, you'll be returned to the scan target selection screen. Here you can manage your completed scans:
Review existing scans
The "Existing Scans Found" section displays all completed scans in your output directory:
- Scan Count: Shows the total number of scans found (e.g., "1 scans found in C:\temp")
- Scan Details Table: Lists each scan with:
- Scan Details: Scan type (VMware Scan, Physical Scan, etc.) and unique identifier
- Servers: Number of servers scanned
- Version: DMC version used (e.g., "DMC 1.1.5")
- Date & Time: When the scan was completed
- Selection: Use checkboxes to select which scans you want to export
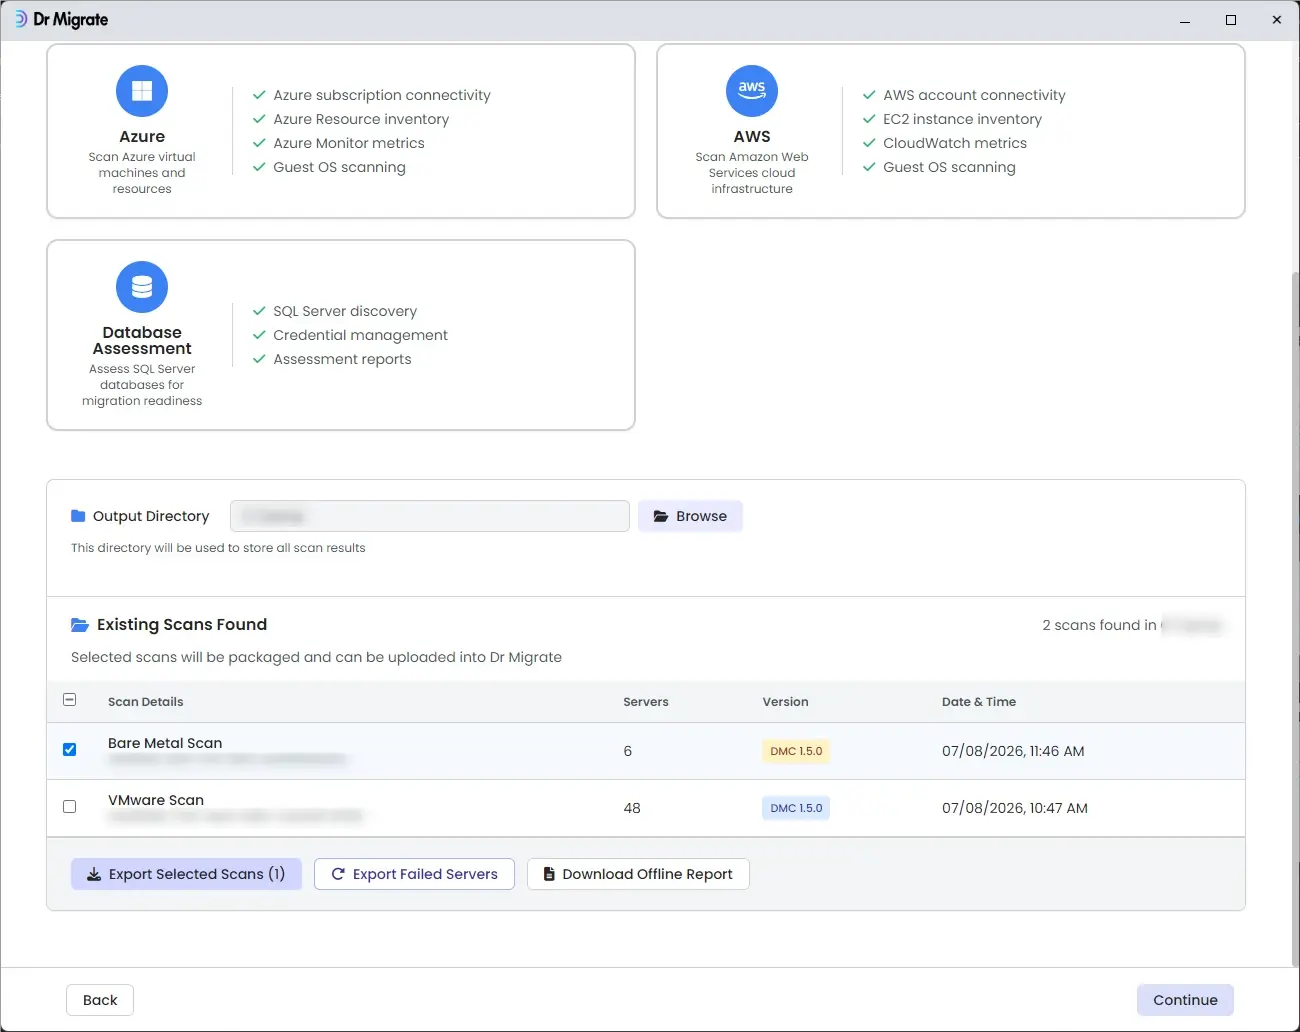
Scan Management: You can select multiple scans to export together, or export them individually. Selected scans will be packaged into a single encrypted ZIP file.
Export selected scans
- Select the scan from the list of discovered scans by checking the box next to it
- Click Export Selected Scans (the button shows the count of selected scans, e.g., "Export Selected Scans (1)")
- Name the Scan: Enter a descriptive friendly name for the export in the modal dialog
After export completes, you'll see:
- ZIP Password: encrypts the results ZIP (for extraction)
- Decryption Key: used when uploading to Dr Migrate
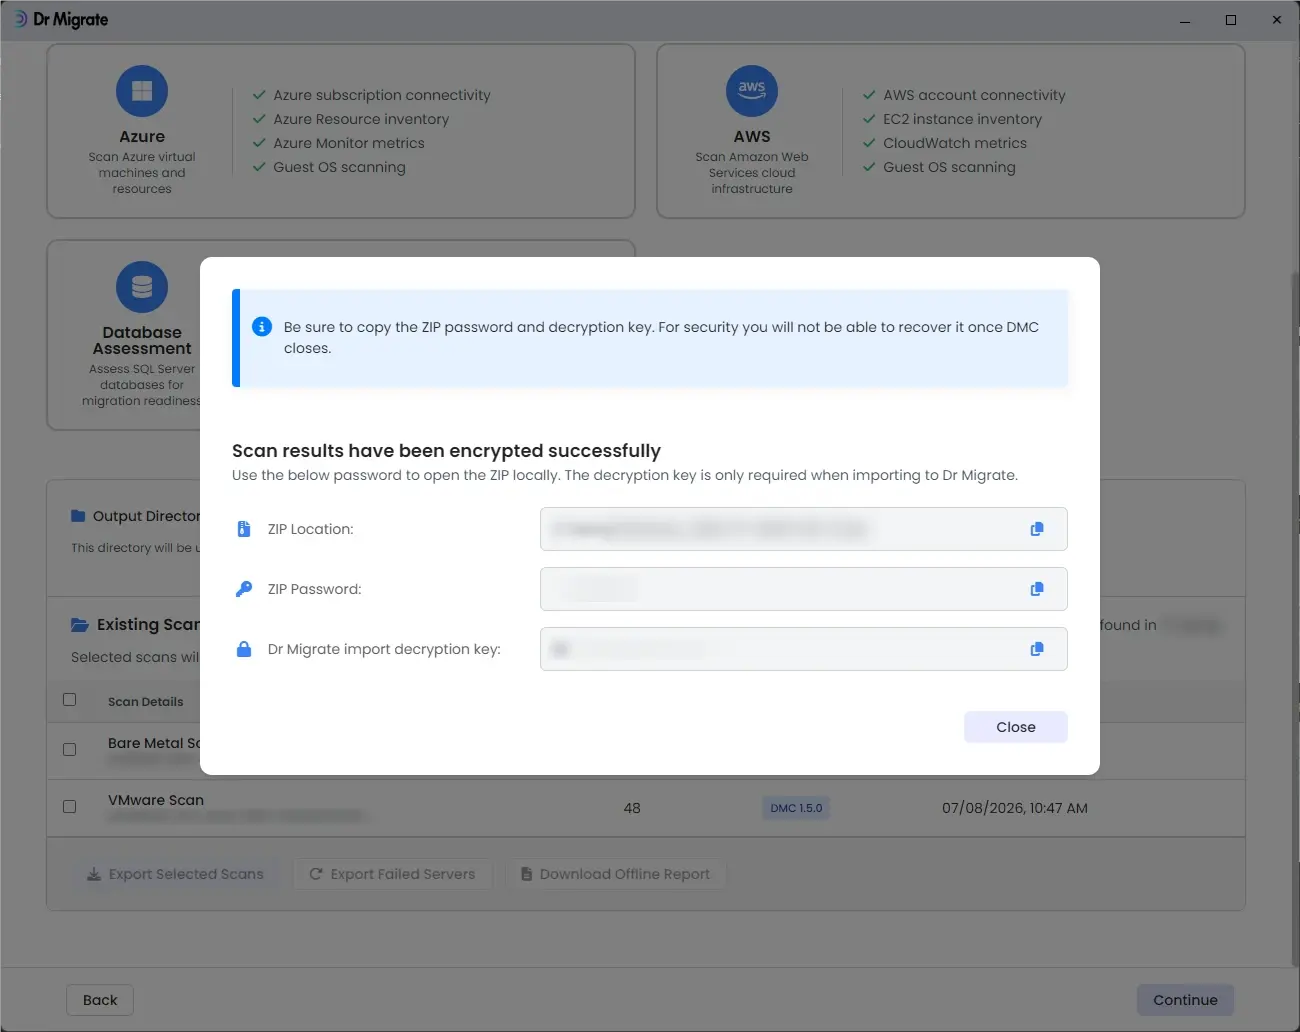
Important: Record the ZIP Password and Decryption Key immediately. These cannot be recovered once DMC closes.
Download offline report
Click Download Offline Report to generate a standalone .html troubleshooting report for the selected scan(s).
The offline report includes the same capabilities as described in the Offline Troubleshooting Report section above.
Upload Your Scans
After exporting your scans, you can upload the Environment file and ZIP to Dr Migrate.