SaaS
Dr Migrate SaaS Hosted uses Azure Migrate’s powerful data collection to derive valuable insights related to your cloud transformation, conveniently hosted within our secure Azure Platform.
This offering is delivered through our Azure Hosted platform, and is secured through B2B MFA Active Directory authentication can connect to view insights.
Accessing Dr Migrate SasS
To prepare for a smooth sync process, ensure you have completed the pre-requisites here
Access your SaaS Instance
Find your instance in the list presented, if you have access to multiple instance’s, you can search for the instance you need.

List of available Dr Migrate instances
Once you are logged in, you will see your deployment. If the VM is not started, please click Start.

Starting a Dr Migrate SaaS instance
Review Getting Started Wizard
The Getting Started Wizard will launch, and present you with some information about Dr Migrate and few short steps to connect your Azure Migrate Project with your instance.
Click Get Started to start the wizard.
Each section can be advanced using the right hand arrow.
Review Dr Migrate’s Assessment Types
The Getting Started Wizard will present you with two Assessment Types to choose from:
- Rapid Mode - The Rapid Mode Report provides a rapid snapshot into everything that has been discovered about your environment.
- Advanced Mode - The Advanced Mode Report provides insights at the application level that are generated after the upload of CMDB data.
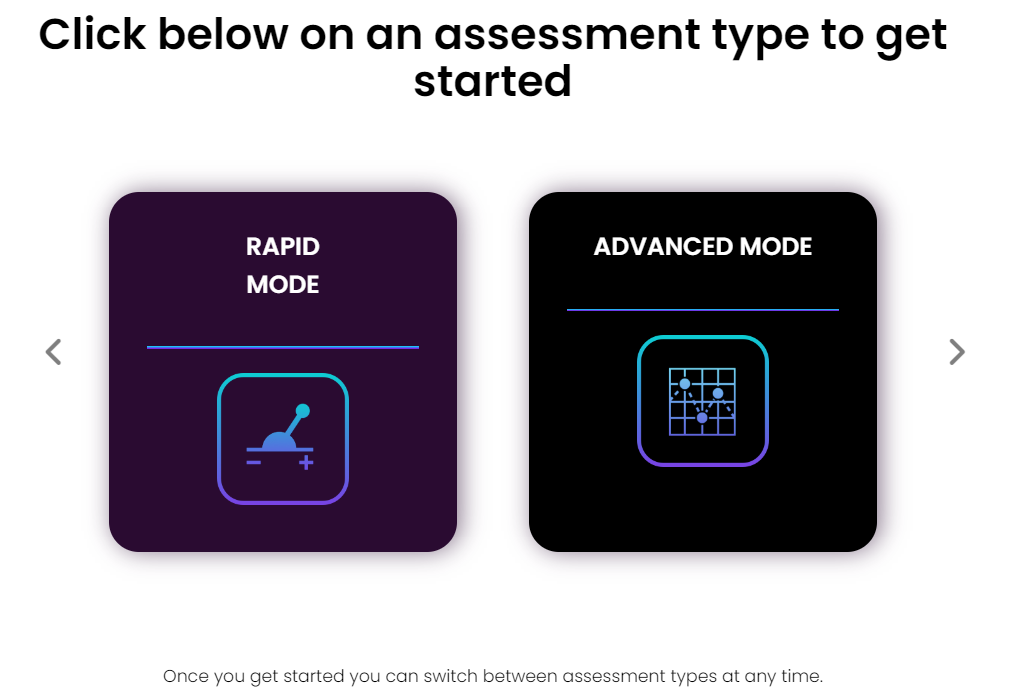
Selecting assessment mode in Dr Migrate SaaS
Choose your Data Backend

Selecting data backend for Dr Migrate
Choose the required data backend of Azure Migrate.
Connect Azure Migrate to your SaaS instance
Clicking Azure Migrate will provide you with the below
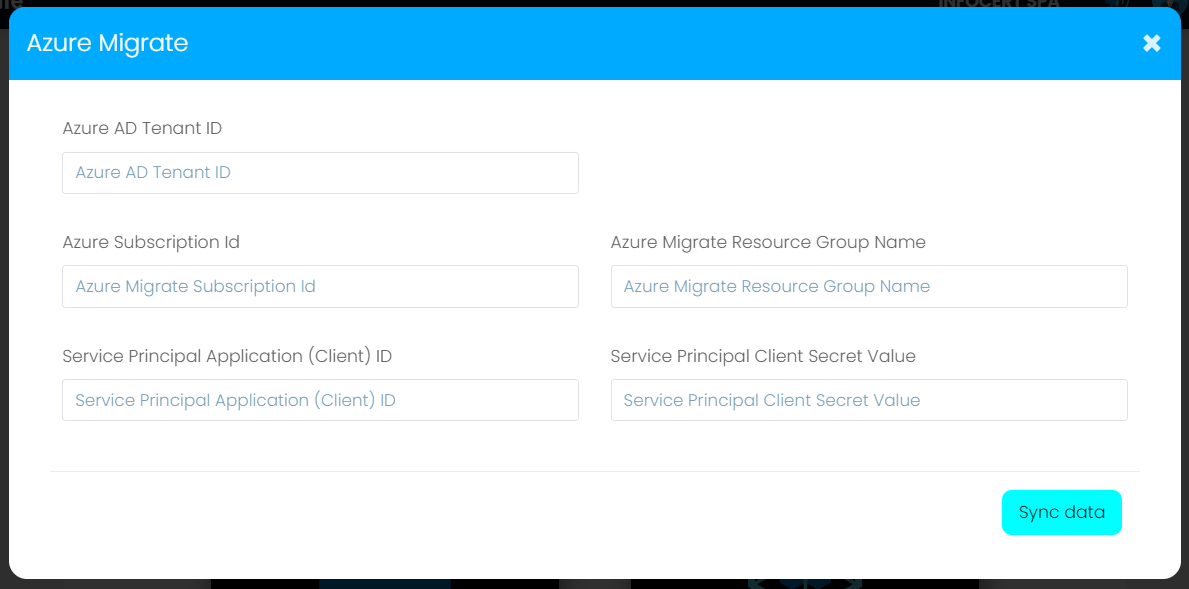
Azure Migrate connection configuration
| Item | Where to Find in the information |
|---|---|
| Azure Tenant ID | Search “Tenant Properties” in the Azure Search bar |
| Azure Subscription ID | Head to the Azure Migrate Resource Group and select “Properties” |
| Azure Migrate Project Resource Group | Head to the Azure Migrate Resource Group and select “Properties” |
| Server Principal Application (Client) ID | Navigate to “App Registrations,” find the Dr Migrate SPN you created and select “Overview” |
| Service Principal Secret Value | Retrieve the Service Principal Secret Value that you stored securely in in the prerequisites steps |
If any of this information is incorrect, or in the wrong format (in the case o the SPN Secret Value), you will receive a alert telling you how to resolve the issue.
Sync Data
Once this information is entered, you can click Sync Data, this will start the data ingestion from the Azure Migrate backend.