Generate Report
.xlsx format, compressed into a .zip file, before proceeding with the import.RVTools Data Collection
To get started you must run RVTools to collect the required data.
If you have concerns about sharing potentially sensitive information during the import process, Dr Migrate AVS Express provides flexibility to accommodate your privacy requirements:
- Dr Migrate provides an Anonymizer Tool to safely de-identify data in an RVTools Export
- This section also details how the RVTools file can be manually de-identified.
Start the Dr Migrate AVS Express
You will need to login to your assigned DrM Kiosk, which is hosted on Dr Migrate SaaS.
Navigate to your instance, and click start. For more information on starting your instance, click here
If you do not have a Kiosk Instance provisioned, and would like one, please contact support@altra.cloud
Accept Disclaimer
You will be presented with a disclaimer, please read and accept the disclaimer to proceed.
Provide Customer Details

Fill out these fields to tell us about your customer
- Customer Details This is the name that will be published on the report
- Target Azure Region This region will be used to calculate Azure future state costing, all currently available Azure Regions are supported
- Currency This is the currency that will be displayed in reports
- MSX Opportunity ID If available, the MSX Opportunity ID, used to to an internal Microsoft opportunity and tracking success of the assessment
AVS Type and Pricing
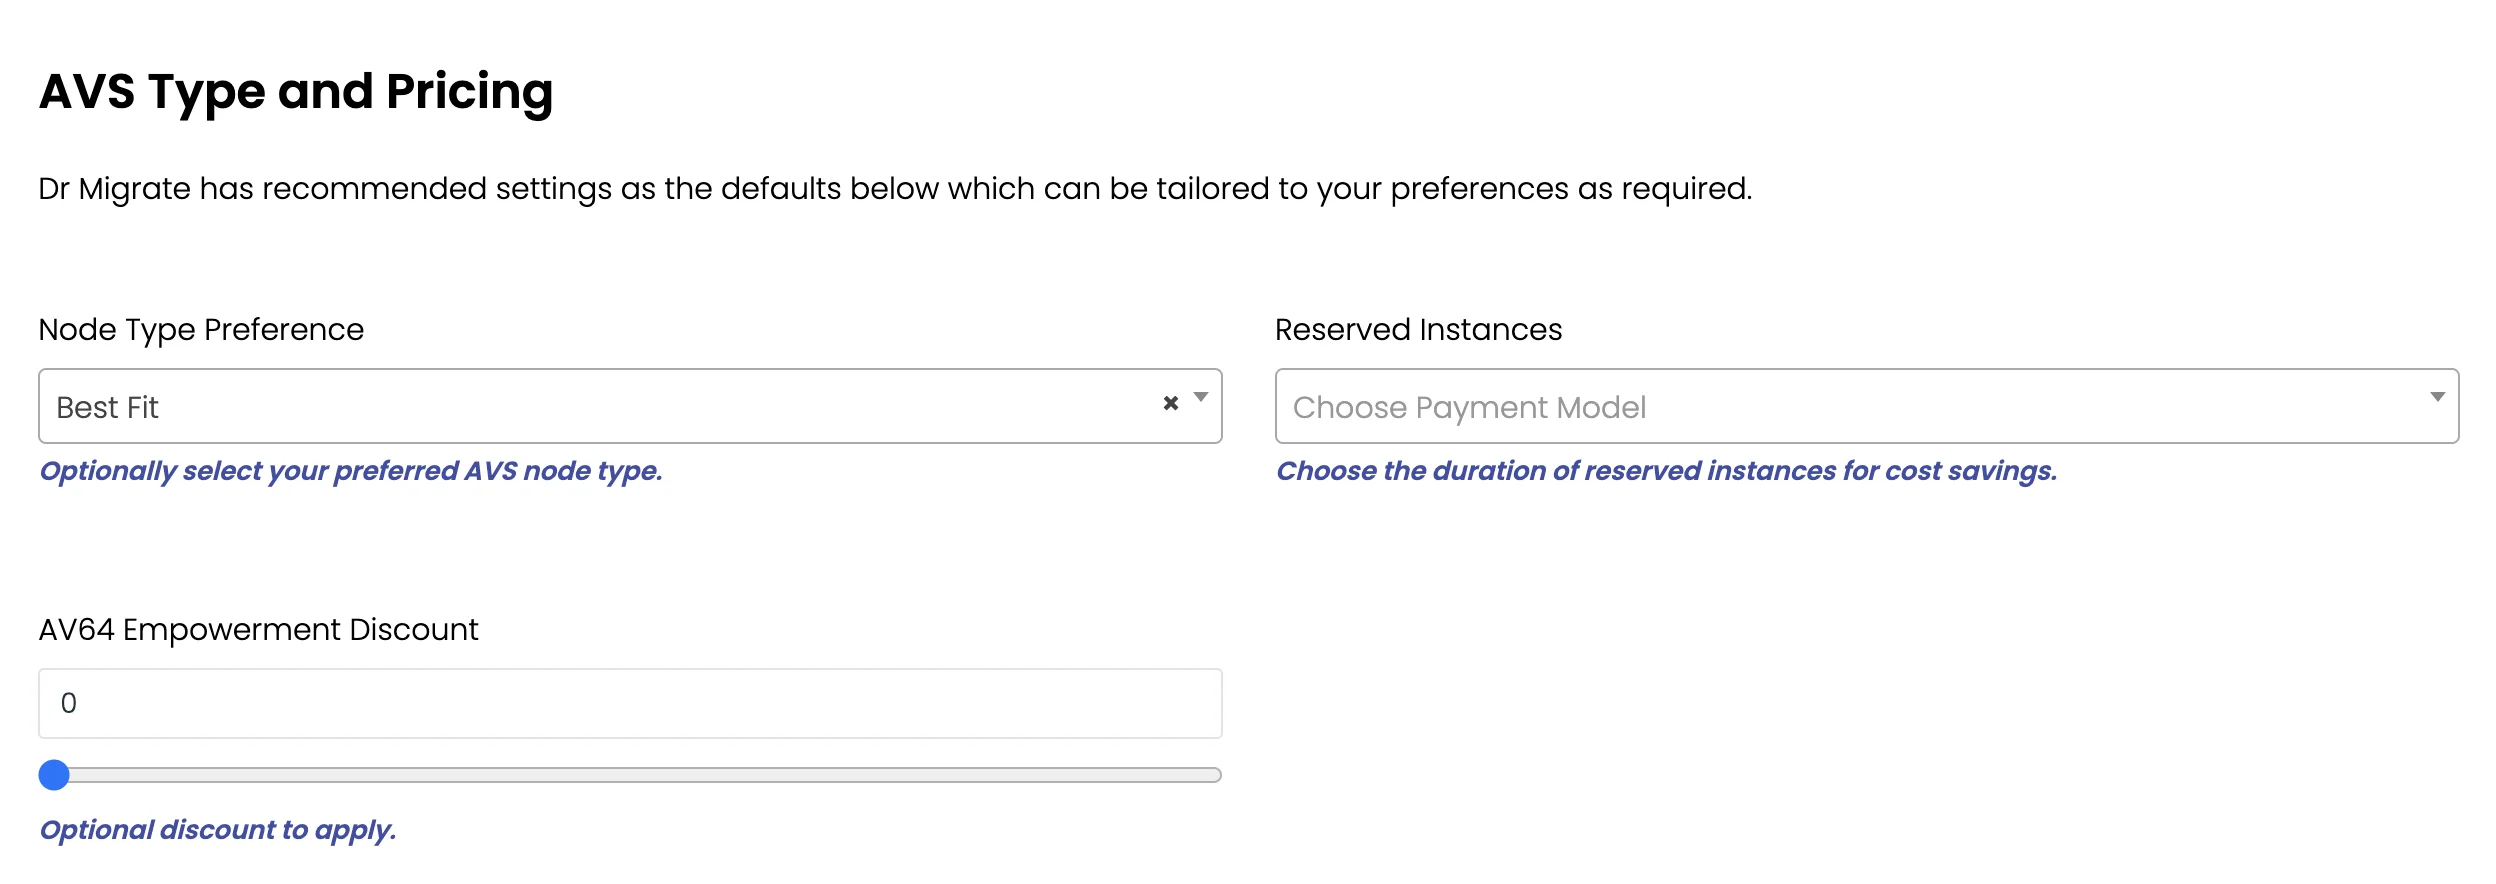
Dr Migrate has recommended settings as the defaults below which can be tailored to your preferences as required.
- Node Type Preference Optionally select your preferred AVS node type, choose from:
- Best Fit - Dr Migrate will evaluate the best AVS SKU for the scanned environment
- AV36 - Only the AV36 SKU will be used
- AV36P - Only the AV36P SKU will be used
- AV52 - Only the AV52 SKU will be used
- AV64 - Only the AV64 SKU will be used
- Reserved Instances Choose the duration of reserved instances for cost savings.
- PAYG - No Reserved instances will be applied
- 1 Year Reserved Instance
- 3 Year Reserved Instance
-
AV64 Empowerment Discount Use the slider to apply a empowerment discount.
-
VMware VCF Annual License Cost per Physical Core Enter your VCF Annual licence cost per physical core, if no value is entered $350 USD per physical core will be used
VMware environment options
Check one or more of these options to have the option to applied to your report
-
Customer will BYO VMware VCF license If the customer has exsiting VCF licenses, AVS Express will use these instead of costing in VCF licences
-
Already running at least | AVS cluster in the same Azure Target Region specified above Ensure configuration
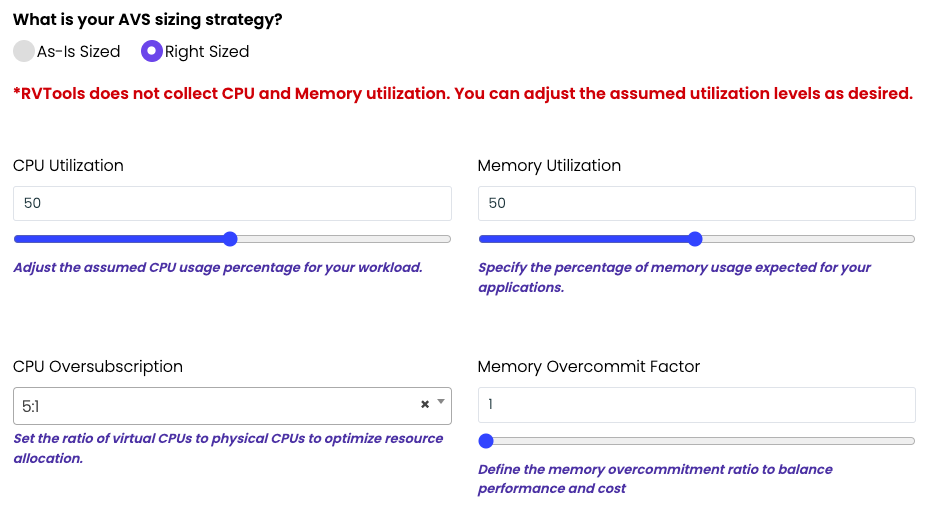
Compute & Memory Configuration
You are able to select either As-is Sized or Right-Sized configuration.
As-sized configuration does not apply any rightsizing percentages.
-
CPU Utilization - You adjust the assumed CPU usage percentage for your workload. The default value is set to 50. Use the slider or input box to specify the desired percentage.
-
Memory Utilization - You can specify the percentage of memory usage expected for your applications. The default value is set to 50. Use the slider or input box to adjust this percentage.
-
CPU Oversubscription - Specifies the ratio of number of virtual cores tied to one physical core in the Azure VMware Solution node, to optimize resource allocation. The default value in the calculations is 5 vCPU:1 physical core (5:1) in Azure VMware Solution. You can select a different ratio from the dropdown menu.
-
Memory Overcommit Factor - Specifies the ratio of memory overcommit on the cluster, used to balance performance and cost. A value of 1 represents 100% memory use, 0.5, for example is 50%, and 2 would be using 200% of available memory. The default value is set to 1. Adjust the slider or input box to set the desired overcommit factor.
Storage Configuration

Dr M Kiosk allows you to configure the RAID configuration setting, and Storage compression factor, to better suit your assessment needs.
-
FTT Settings, Raid Level - Specifies the valid combination of Failures to Tolerate and Raid combinations. The selected FTT option combined with RAID level and the on-premises vSphere VM disk requirement will determine the total vSAN storage required in Azure VMware Solution. The default setting is 1, RAID-5. Use the dropdown menu to choose a different RAID level if needed.
-
Dedupe and Compression Factor - Specifies the anticipated deduplication and compression factor for your workloads. A value of 3 would mean 3x so for 300GB disk only 100GB storage would be used. A value of 1 would mean no deduplication or compression. The default value is set to 1.5. Adjust the slider or input box to specify the desired ratio.
Upload RVTools File
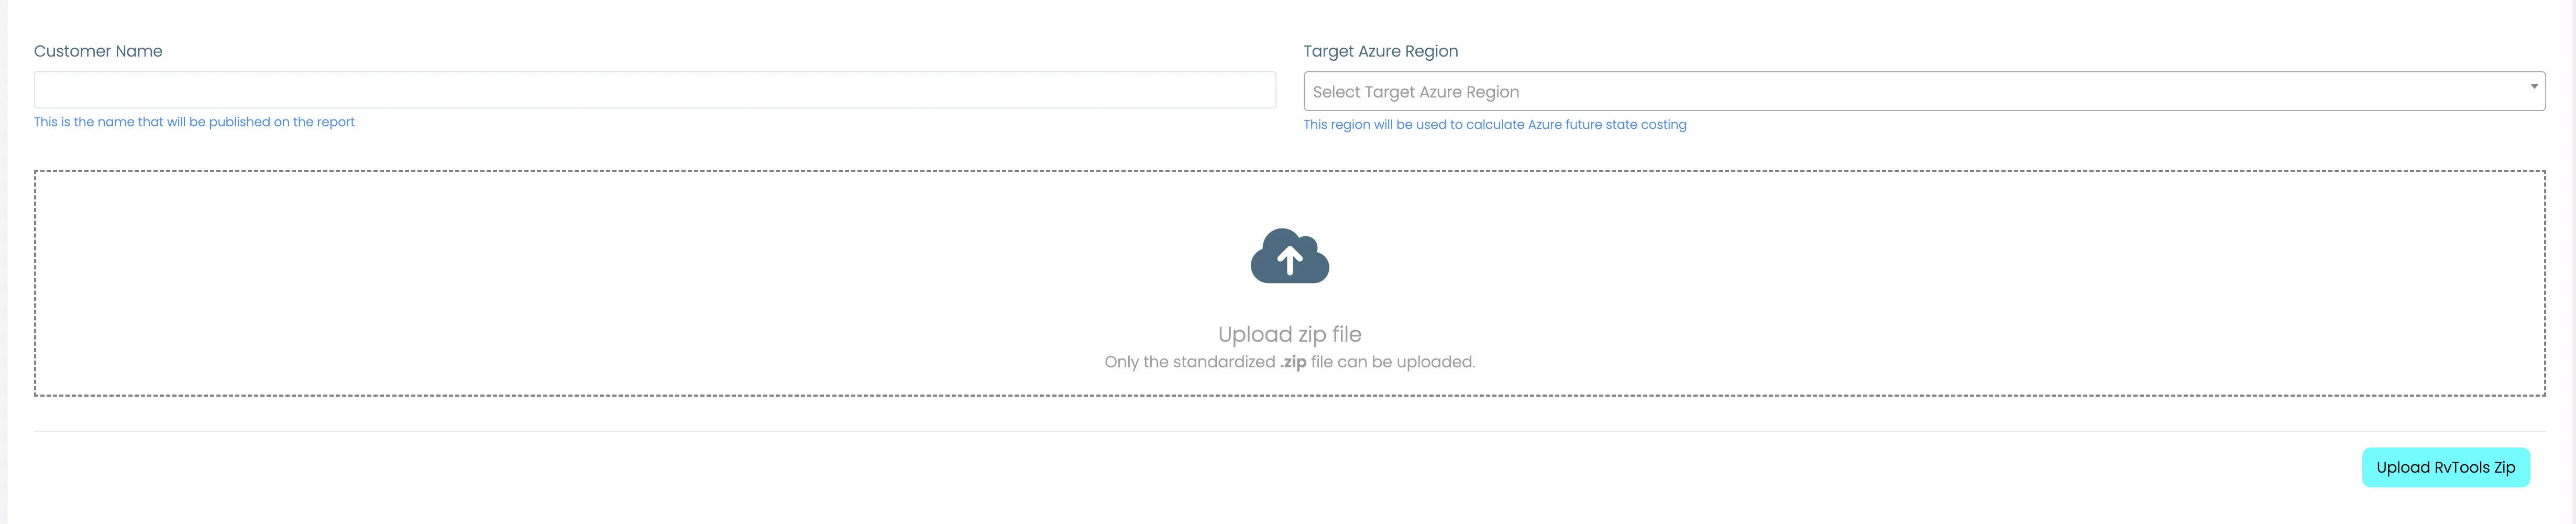
Click the ‘Upload RVTools Zip’ button to initiate the upload process. use the file picker, to navigate to and select your prepared .zip file. Once you agree to start generation, it will begin.
Report Generation
Once the file is uploaded, the system will process the data. Reports cannot be stopped once started and must complete before beginning another report.
Analysis and Processing
Excess Storage Analysis
After initial processing, if excess storage is detected you will see a configuration screen.
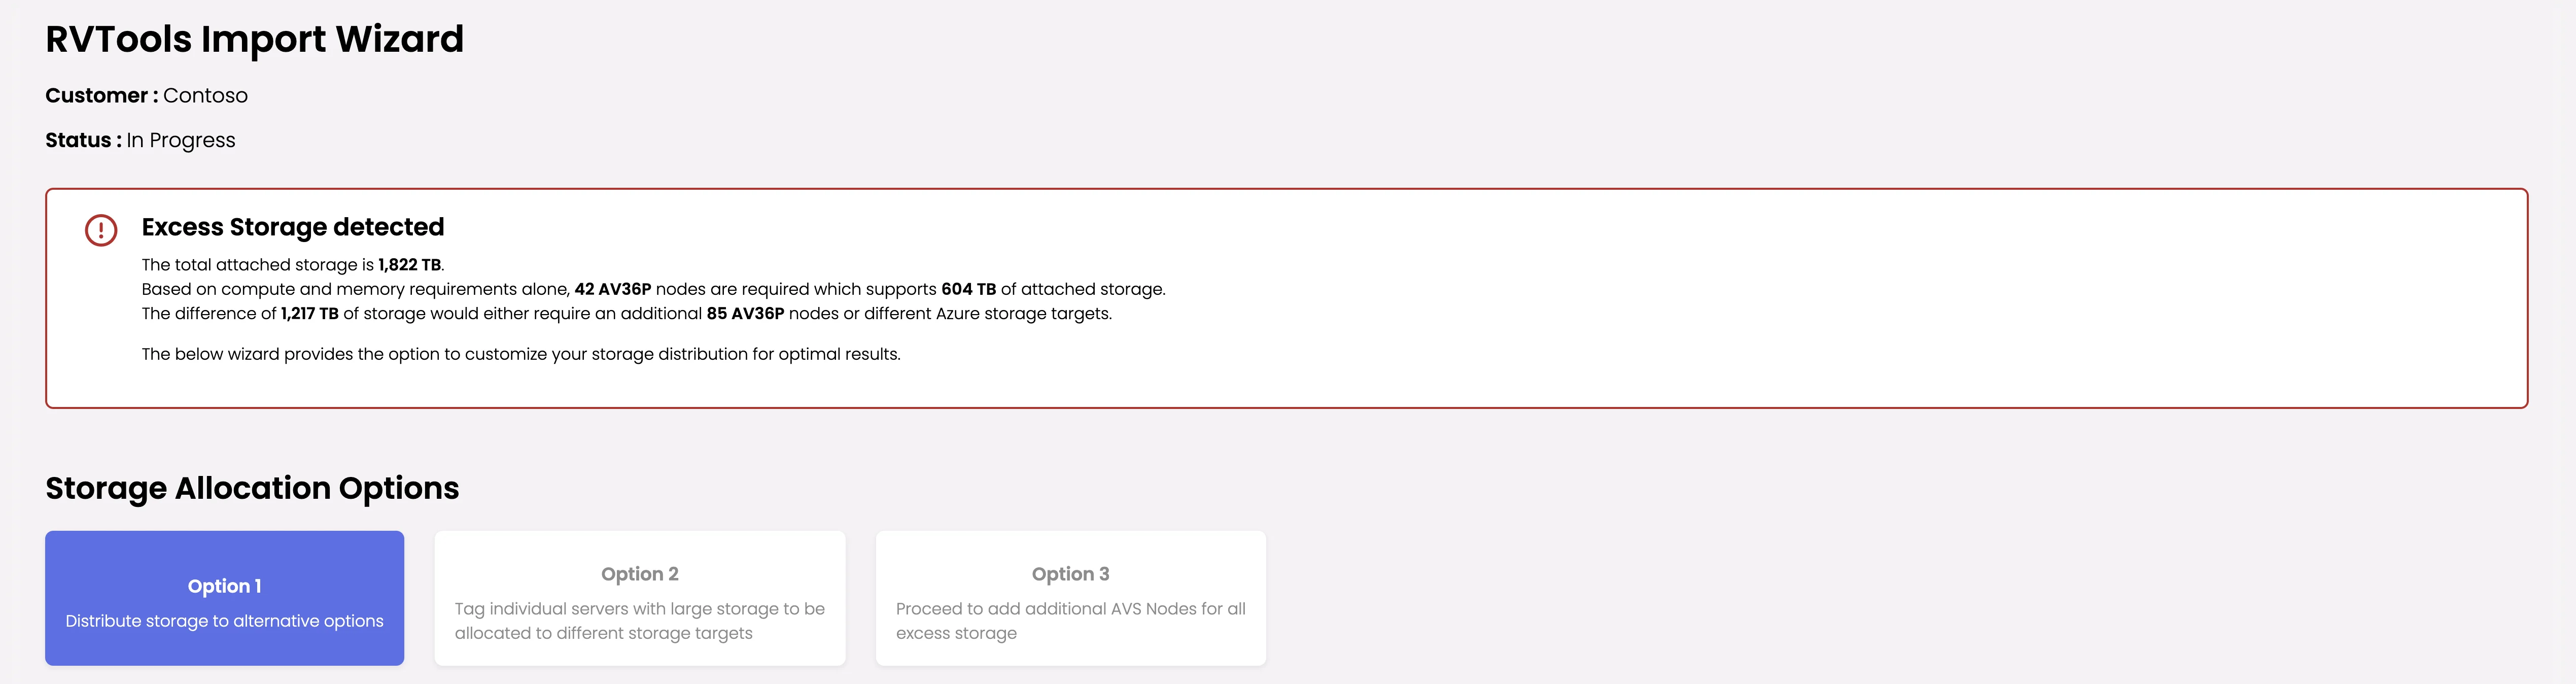
Excess Storage is defined as where additional AVS nodes are being added simply to account for storage requirements, rather than any compute or memory requirements (i.e. the recommendation would be storage bound).
The wizard will then provide you with a number of options to better allocate the storage requirements to a variety of Azure storage solutions.
This can significantly impact the cost of the final solution and make for a better cost case for moving workloads to AVS.
Storage Allocation options that are provided:
Option 1: Distribute storage to alternative options
Dr Migrate will help you minimize the number of additional AVS nodes by giving you options on how you want to distribute the detected excess storage can be across other Azure storage targets.
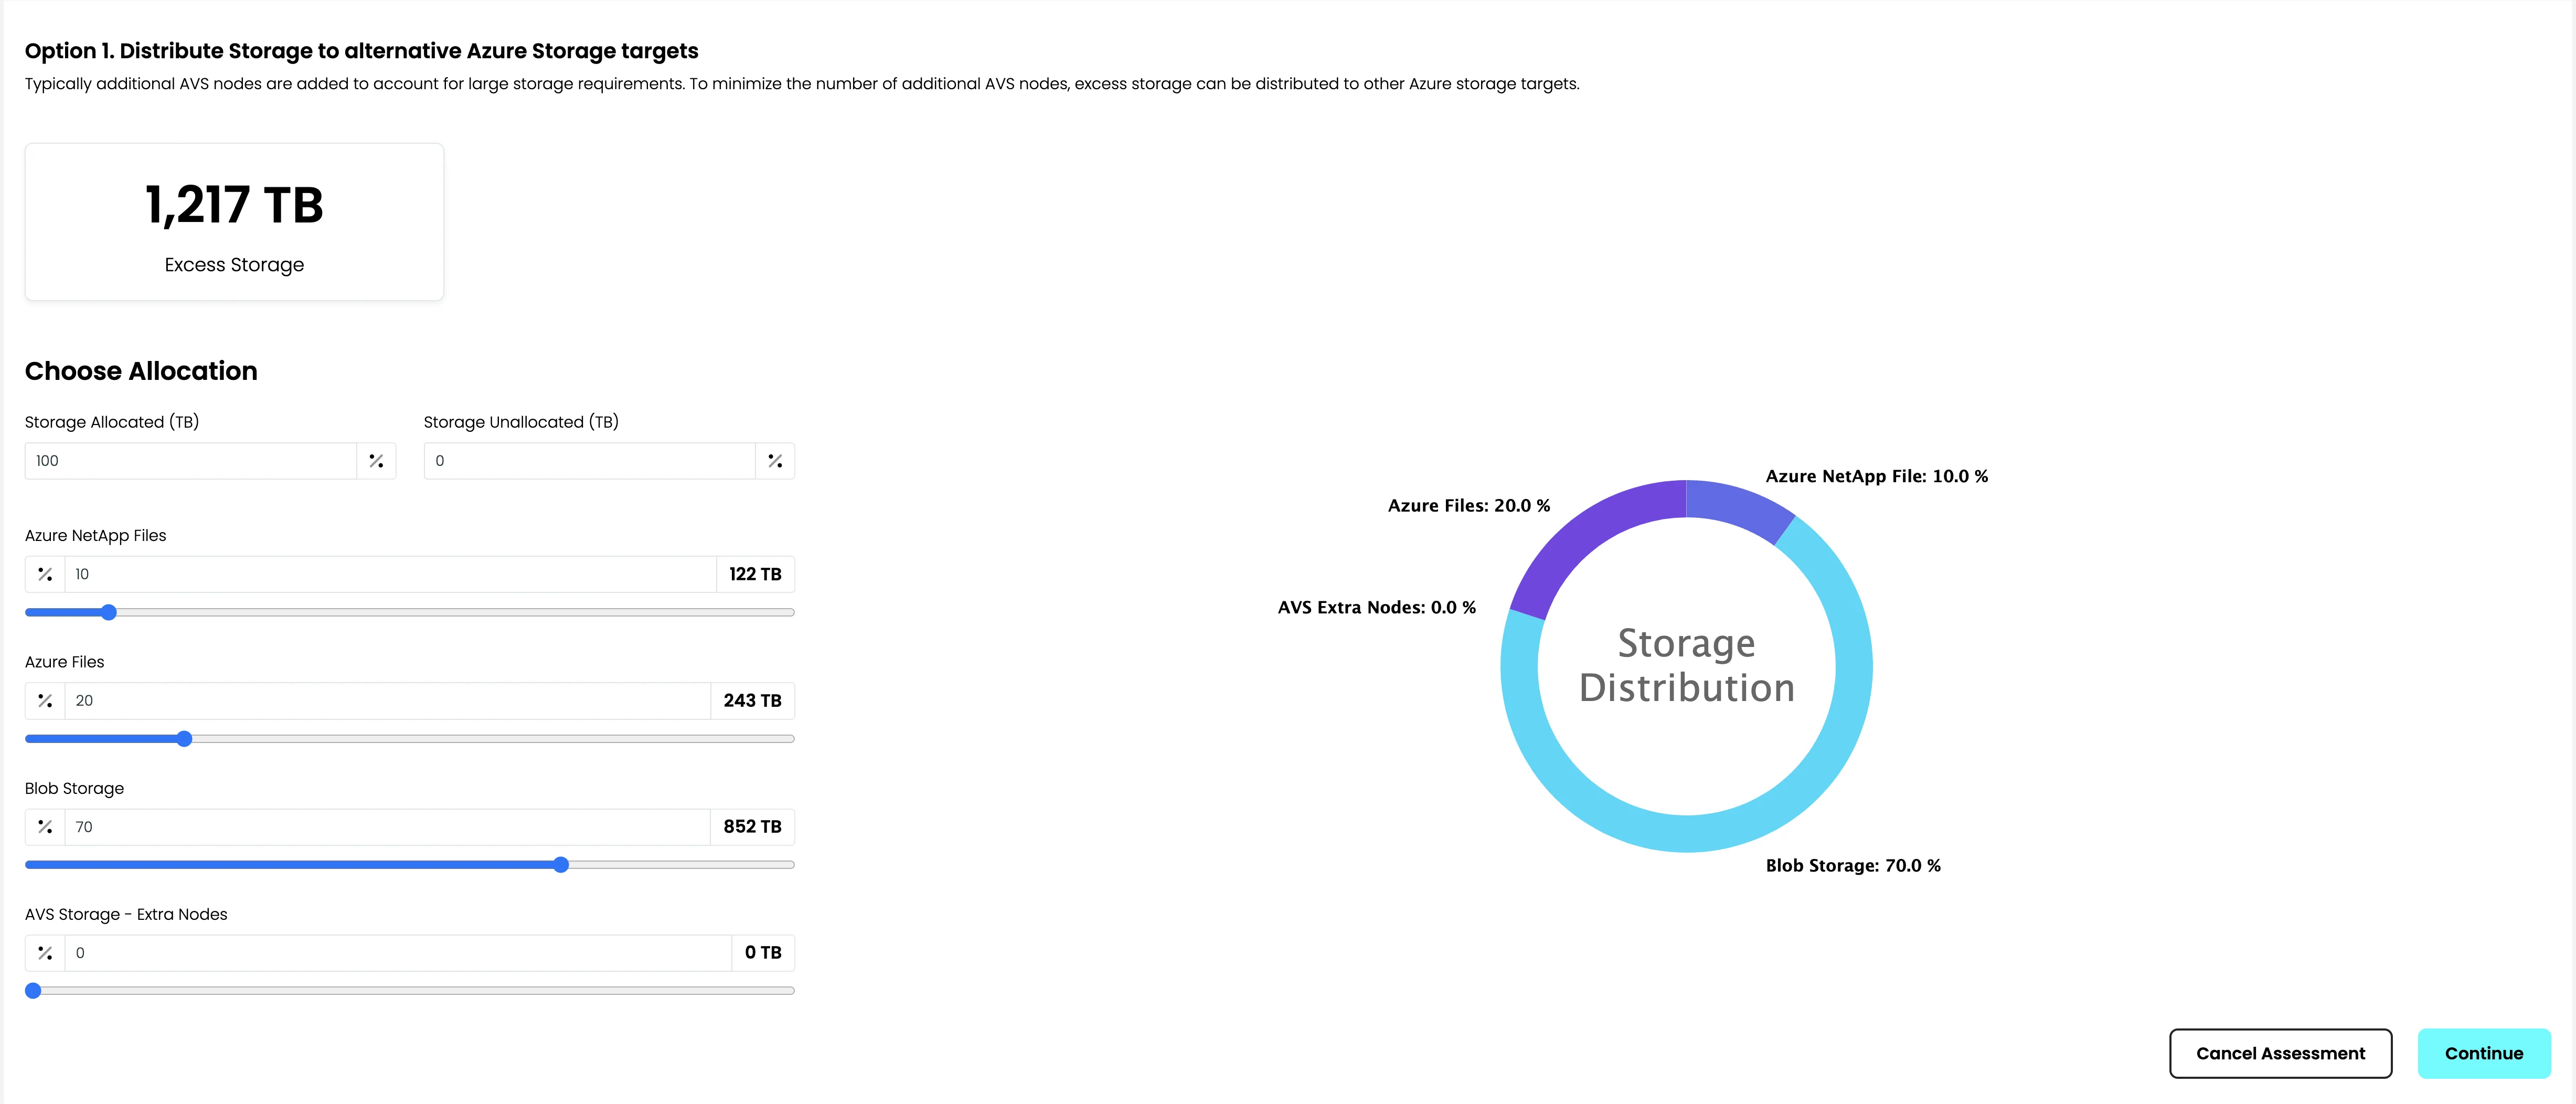
Use the sliders for Azure NetApp Files, Azure Files Blob Storage and additional AVS Nodes, to determine the mix of storage allocation you wish to use.
Once you are happy with your allocation, click continue to start report generation.
Option 2: Tag individual servers with large storage to be allocated to different storage targets
Use this option to specify the storage type per server. The downloadable file will list the servers with the largest attached storage. Assign preferred storage target for as many servers as you like.
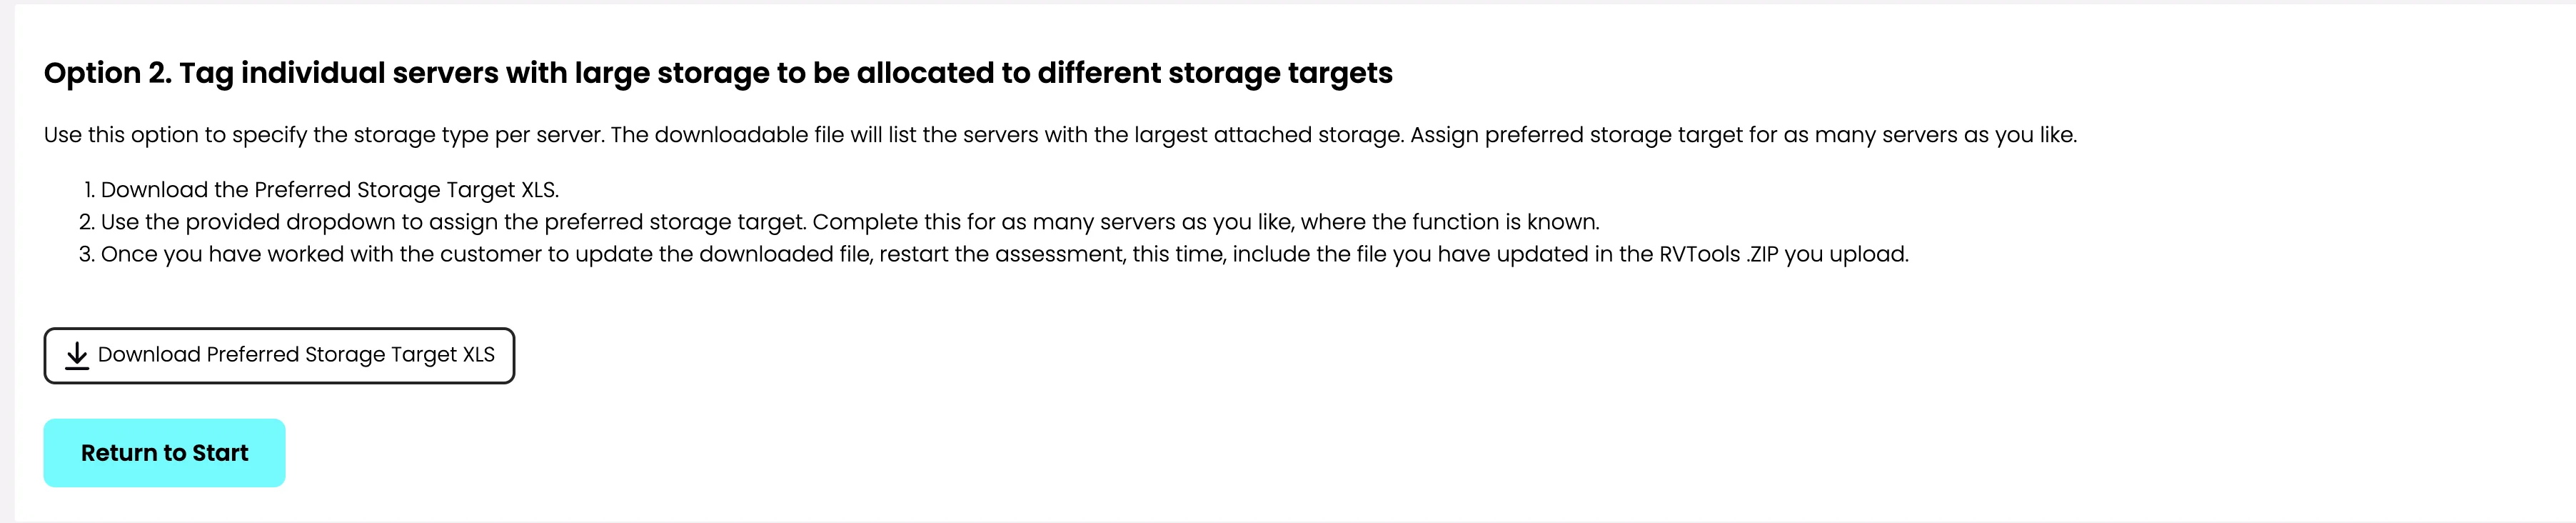
How to Populate Excess Storage Target Workbook
Download the Preferred Storage Target XLS, this will take a few moments to generate.

Use the provided dropdown to assign the preferred storage target. Complete this for as many servers as you like, where the function is known.

The workbook provides the following options for assignment
- Blob Storage (LRS) - Allocate the storage to Azure Blob Storage using LRS redundancy
- Azure Files - Allocate the storage to Azure Files
- Azure Net App Files - Allocate the storage to Azure Net App Files
- AVS Storage - Allocate the storage Additional Nodes - Allocate the storage to additional AVS Nodes
Work with your customer to update the mapping file, restart the assessment, this time, include the file you have updated in the .ZIP you upload, and upload.
Dr Migrate will now use this mapping file to correctly map excess storage to your requirement.
Option 3: Proceed to add additional AVS Nodes for all excess storages
No alternative storage option will be used. All storage will be allocated to AVS nodes.
Click Continue to proceed with report generation.
If you encounter any issues during the upload or processing, contact Altra Support for assistance.